Tuesday, 17 of June of 2025

Tag » Tricks and Techniques

Developing Your StarCraft 2 Mechanics – A Back to Basics Guide

In this StarCraft 2 guide SC2Cha0s goes back to basics on the game's mechanics to make you a better and more competitive player overall.

Starcraft II is a very challenging and invigorating game that can take years to master. This article will be the start of a companion guide to a video series that was started this week. Today, we will be venturing on a journey to master the art of control groups and location hotkey. Utilizing these tools in SCII will greatly increase your ability to multitask as well as become more efficient at managing your base.

Before we get started, I suggest you open up your settings within Starcraft II and follow along this simple guide of setting up location hotkeys. Once logged in, go to:

  • Settings -> Hotkeys ->Global -> Camera.

Once here you should see a screen similar to the picture below.

StarCraft 2 Control Groups

If you scroll down a bit, you will notice that Locations can be created using the key combination Ctrl+Shift+F1. Personally, I find this combination of key a little difficult to utilize. I have found that changing this bind to simply Shift+F1 makes these hotkeys a lot easier to utilize. Since I only use 4 location keys, I change locations 1 – 4 to this binding. Once that is complete, if you scroll down a bit more you will find the “Jump to Location #” hotkeys. I would recommend changing these to the simpler F1 – F4. This allows you to instantly jump to a location that has been set up by pressing the F1 – F4 (depending on which location you would like) key. Once these are set up, you are ready to give them a try. Start a custom game and gives these new bindings a try before utilizing them on the ladder.

The next topic I would like to discuss is Control groups. Control groups allow you to assign a group of units or buildings to a number key for easy access. For Example, at the beginning of every game (before the auto glhf), I tend to click the nexus build a probe and immediately hit Shift+4. This binds the nexus to the number “4” key and allows me to easily continue to build probes throughout the game.

Once a unit or building is bound to a number, centering your screen on that unit is rather easy. By double tapping a control group, the camera view will instantly center itself around the unit or group of units. This technique allows for players to switch between multiple units of interest extremely quickly. Pro players utilize this technique to have clear vision of everything within their units’ vision.

Below is the video series episode that discusses control groups and location hotkeys. This video will help you get started with setting up the location hotkeys as well as walk through a brief demonstration.

As a requirement to this Back to the Basics series, I would like you (yes, you the person reading this) to open up Starcraft 2 and create a custom game and give these mechanics a try. Once you have given it a try, come back to this article and let me know how it went. Also, feel free to leave any questions if you have any.

For more Starcraft 2 content and updates on tutorials and live streams feel free to follow me on Twitch and YouTube:

Have fun on the ladder!

Andre “Cha0s” Hitchcock


Using Force Fields Effectively

In this article we look at possibly the most valuable tool in the Protoss' arsenal: the Force Field!

The Sentry’s Force Field ability is probably one of the most important tools Protoss has. It can be used to defend when an early attack could not otherwise be defended or to assault your opponent while forcing their army into a bad position.

Games can hinge on good Force Fields, it’s not uncommon that an incorrectly placed Force Field will cost a Protoss player the game. It is crucial for your progression as a Protoss player to at least have a decent grasp on Force Field use.

In preparation for this article I looked at a lot of games from three professional players well known for their near-perfect Force Field use: White-Ra, iNcontrol and oGsMC. I have also been doing a lot of work on my own Force Field use, with great results.


How To Cast Force Field

Assuming ‘F’ is the hotkey for Force Field (F is the Default) the to best ways to cast it are:

  • ‘F’ > Click each Force Field individually, or,
  • Hold ‘F’ down and click for each Force Field you want to cast.

This is purely personal preference, I use the first option because I feel it makes me place each Force Field a little better than if I use the second option. Try both and decide which is more comfortable for you. Do not ‘Shift+F’ Force Fields as it causes the Sentries to cast after they kill the current unit that they are attacking.


How Many Sentries are Needed?

The following is based on my experience and my observations on professional Protoss players. I give a range of recommended Sentry counts so that you can adjust depending on how good your Force Field placement is. If you are not confident that you can be very efficient with your Force Fields use the higher Sentry count suggested.

  • When defending one base with a ramp 3-4 Sentries is enough to block the ramp for as long as you want.
  • When moving out to take an expansion a minimum of eight Sentries is recommended against Zerg. Eight will allow you to have enough Force Fields to easily defend any Zergling attacks and small Roach pushes for a good amount of time.
  • When moving out to attack or secure further expansions 8-10 Sentries is recommended to effectively apply the techniques discussed in this article. This is true in any matchup, especially when you are using Colossus in your army. Effective Force Fields will greatly amplify the effectiveness of Colossus.


Force Field Techniques

The Force Field ability is very versatile and its uses are only limited by your creativity. The following are common techniques that you can use to great effect.


Ramp Block

This is the most simple of the techniques and only requires a bit of timing to do well. Force Fields are used to block enemy forces from coming up (or going down) a ramp. You can place the Force Field to completely block enemy troops or you can attempt cut the army in half as it comes up the ramp netting you a few easy kills.

In this game WhiteRa used a Force Field to prevent enemy Zerglings from reinforcing an expansion.

In the same game WhiteRa uses a Force Field to trap a few Zerglings on a ramp. Easy kills.


Open Field Block

Used to prevent enemy forces from engaging with your army or to prevent flanks. This technique should be used when you want to completely avoid an engagement or if your troops outrange those of the enemies, a common thing for Protoss. You can improve the effectiveness of this technique by utilising chokes, walls or buildings to help block the enemy’s movement.

Zerglings can easily be blocked by using Force Fields in the choke created by the gateway

oGsMC blocks off the Roaches allowing his Stalkers and Colossus to attack freely.


Cut and Trap

Using Force Fields you can cut an enemy’s army in half and trap some of the units to be easily killed by your Zealots. Using this method you can safely chip away at the enemy’s forces whilst taking minimal damage yourself. You can also trap any units caught off guard by creating a concave of Force Fields behind the enemy’s units. I group these two techniques together because cutting an enemy’s army is the same as trapping a portion of it. Using these methods you will never have to engage the enemy at his full strength.

oGsMC uses Force Fields to trap a few roaches that are separated from the Zerg's main army.

In this game I manage to cut a few units off from my enemy's army giving me easy kills.


Bottleneck

A bottle neck is essentially a small choke, it restricts movement to your enemy’s army and causes them to bunch up into a gap. This technique works with splash damage from Colossus or Psi Storms and it also tempts all but the most experienced of players into engaging when they should be pulling back.

The bottleneck created here forces the Terran opponent to either pull back or fight a bad engagement.

Here multiple bottlenecks have disrupt the enemy's arc and maximise the effectiveness of the Colossus.


A Few Tips

Following this advice can help you use your Sentry’s energy more efficiently and help you to have better engagements.

  • Troop Movement is extremely important: engaging at chokes or near walls will make your Force Fields much more effective.
  • As the enemy approaches throw down one or two Force Fields pre-emptively, then if he continues past those complete the cut. This makes cutting his army easier as it makes a temporary choke-point.
  • Try to not overlap your Force Fields, doing so wastes valuable energy that could be used on more Force Fields or Guardian Shield.
  • If you have High Templar in a control group casting Force Field becomes difficult, set your Sentries to a different control group to make using Force Field quicker and easier.
  • Calm Force Fields are well placed ones. Easier said then done. Try breathing out before you spam them everywhere.


When Force Fields DONT Work (Or, How To Deny the Protoss Force Field Use)

In the following situations Force Fields will hinder you or flat-out not work, avoid over producing Sentries if you encounter one of these.

Against Massive Units

Colossus, Thors, Ultralisks and Archons (as of patch 1.3.3) are all ‘Massive’ class units and will break Force Fields upon contact with them. If your opponent is leading their attack with these units do not Force Field, instead use your energy on Guardian Shield and Hallucinations.

Against Siege Tanks

Siege Tanks are generally stationary and have a long range, using Force Fields when facing a large number of tanks will help your opponent more than you. However, if you can, use Force Fields to prevent Terran’s units from pulling back into range of their tanks using the Cut or Trap techniques.

Against Air

Yep. Doesn’t work against air units.

When Your Opponent is Highly Mobile

This one is a little different. If your enemy is playing a highly mobile game (using fast units and drops or other harrasment) Force Fields become limited in their usefulness overall. You can still use a few Sentries to prevent some attacks but most mobile players will simply attack elsewhere. In this situation limit your Sentry production and instead focus on your own mobile units to counter or build up for an attack.


Has Force Field use been something you have struggled with or are you the oGsMC of your division? I am still having trouble with making sure that I don’t overlap them too much. Let me know about your Force Field skills in the comments below!

A special thank you to Ramzdale for helping me get a few of these awesome pics!


Keyboard Control: The Power of Shift

In this article I go through all the uses of the Shift key from the basic queueing of move commands to advanced techniques like "Smart Blinking".

In another article (“Getting Used to the Keyboard in Starcraft 2”) I talked a little about the Shift key and if you have been playing SC2 for a while you probably have a bit of an idea of how versatile it can be. Players are still coming up with creative new ways to use the functionality of the Shift key, it’s just such a great tool. If you are keen to improve your play, then you should try and take advantage of what the Shift key can do for you.


What the Shift Key Does

Before we move onto all of the nifty things that you can do with Shift lets take a brief moment to understand the mechanics of what it actually does.

Shift basically ‘Adds’ something to a list

In nearly all situations holding ‘Shift’ tells the game to ‘add’ something to a list. This list could be a list of commands or it could be a list of units/structures. There are a few situations where it acts a little differently but this is its main function. For example, ‘Shift-clicking’ a Marine whilst already having a Marine selected adds it to your current selection group. However, ‘Shift-clicking’ an already selected Marine will Deselect it. So in that situation it acts in reverse to its normal function.

Shift can be combined with other Keys

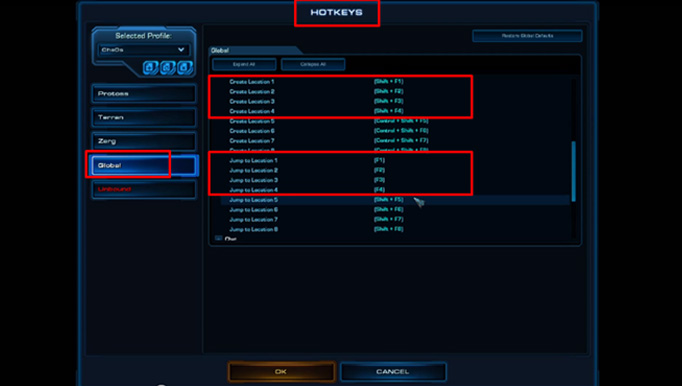
Using the Shift key with other keyboard keys can produce some interesting results. For example, “Shift-[Control group ‘1-0’]”. While ‘Control-[1-0]’ creates a control group, using Shift with a control group number will ADD the current selection to that control group. Use this frequently to ensure that all of your units are bound to a control group.

Now that we have that covered we can move on to the ways that you can use the Shift key to ‘pwn n00bs’ in SC2.


Using the Shift Key: The Basics

The following uses for Shift are more than just ‘cool’ or ‘tricky’, these are the crucial things that you should use every game if you want to play well.

Hands Free Scouting

You can queue up multiple move commands with any unit by holding the Shift key and right clicking for each point you want the unit to move to. Using this your unit can scout for your enemy’s base, proxy buildings and expansions without your direct control, freeing you up for more important things. You can even do this via the mini-map!

Attack-Move Scouting

This is merely a variation on the previous Shift technique. Instead of queueing up multiple Move-commands you can queue up multiple Attack-move commands. Simply press ‘A’ (or your equivalent attack hotkey) and left click each point you want your unit to attack move whilst holding Shift. You can use this technique to find and attack any stray workers or Overlords around the map. Having a few units Attack move scouting around the map can really help you maintain map control and deny your opponent’s scouting attempts.

Queue up multiple construction orders to quickly set up a base as Protoss.

Queuing Buildings

This works best for Protoss and can be useful for Terran but if you’re Zerg you’re not going to get too much use out of this one. To do this simply hold shift every time you place an additional building and your worker will add them to their ‘to-do’ list. I’ll run with the Protoss example because it works so nicely for them. You can tell one worker to build a heap of Pylons at once or you can easily place different buildings such as a Pylon, a Nexus and 2 Assimilators (Instant Expansion, just add water!™). It works the same way for Terran, but much more slowly due to the worker having to physically build each building. Unfortunately for Zerg each Drone can only morph into one building.

Automatic Return to Mining

This is most useful for Terran, quite useful for Protoss but, again sadly, of no use to Zerg. Once you give the order for a worker to construct a building hold Shift and Right-click a mineral patch. Once your worker is finished building he will return to mining with no downtime. You should be doing this 100% of the time, so start getting into the habit!


Using the Shift Key: The Fancy Stuff

Leapfrogging Siege Tanks is much faster using Shift.

The following uses of the Shift key can be extremely useful but usually only in a very specific circumstance. Take the time to learn the ones that are relevant to you Race and play-style.

Easy Siege Tank Movement

Using Shift you can tell a tank to un-siege, move, and re-siege on arrival. Moving your Tanks in this way allows you to leap-frog your tanks towards your opponent much more easily.

To perform this technique you select a Siege Tank and whilst holding shift  press ‘D’ (Un-siege), issue a move-command and then press ‘E’ (siege-mode).  A tank army pushing forwards using this technique can be quite hard to engage.
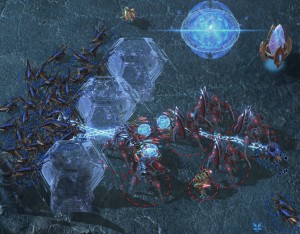
Smart Blink

This technique allows an entire group of Stalkers to Blink across a gap one at a time without leaving any behind. It is quite a complex technique to explain and its best done in this video by StarcraftScientist. This is an awesome technique to watch and even better to execute.

Overlord Creep Highway

Spine Crawler, Hydra, Queen pushes are only possible with a fast creep highway.

You have probably watched Fruitdealer or another top Zerg player use Overlords to make a creep highway to their opponents base, but if you have attempted it before you probably realised how fiddly it is to tell each Overlord to go to each point along the highway.

However, there is a much faster and easier way to do this. Select a large group of Overlords and tell them to generate creep. Now send the entire group to the first point on your highway. Now, holding Shift, de-select one Overlord and then tell the rest of the group to move to the next point. Continue for each point along the intended highway.

It only takes a few seconds to set this up and the result is that the entire group travels along the highway leaving one Overlord behind at each point.

Move To and then Patrol

Using the patrol command will cause a unit to patrol between its current location and the selected one. Using Shift you can tell a unit to move to a location and then patrol from that location. Simply tell the unit to move where you want it to start patrolling from then hold Shift and press “P” (Patrol) and left-click where you want the unit to patrol. You can use this technique to easily tell a unit to patrol between two of your opponents potential expansion locations.

Kill That Constructing SCV

Ever notice that your melee unit stops attacking the constructing SCV when it moves? Simply hold shift and tell your unit to attack it multiple times. Your unit will now follow it whenever it moves. Deny the Terran’s wall-off with 50% more ease!

Rally to Your Units

You may already employ the tactic of attaching a rally point to a unit so that your forces stay together even when you move your army. But what happens when that unit dies? You lose your rally point. This can be especially painful when you lose a battle because half of your units are back in your base.

To avoid this you can select a building, hold Shift and Right-click on multiple units. Now if one of those units dies, your newly built units will still move to your army. Unless of course your entire army dies.

Easy Drops

Want your untis to drop as soon as your Medivac/Overlord/Warp Prism arrives? Simply tell your loaded transport to fly to where you want to drop, hold Shift, Press “D” (Drop) and left click at the drop point. With the Warp Prism you can also hold Shift and press “E” to tell it to enter Phasing mode after it unloads.

Similarly, you can tell a Viking to fly to a location and then transform upon arrival using the same technique of Move > Shift + “D” (Assault Mode).


As you can see there are a lot of useful and creative uses for the Shift key. I am sure that there are even more creative uses that are yet to be discovered. Do you know of any other uses for the Shift key? If so let me know about them in the comments below!


The Little Things You Can Do to Get an Edge in StarCraft 2

In this post I share some of the subtle things that you can do to give yourself an edge over your opponents in Starcraft 2.

There are many things that players do to get an edge over their opponents in Starcraft 2. Individually these wont take you from bronze to gold, but when combined they can give you a decent advantage. Normally, you would pick up these nuances through experience and by watching other people do them, but this can take a while. Instead I thought I would save you the time and just share them with you here. Aren’t I nice?


‘The Split’

A perfect 'Half and Half' split. Not mine of course.

How you send your initial six workers to mine seems like such a small thing and really, it is a small thing. If you box select all of your workers and send them to a mineral patch they will sort themselves out, but this can take a few seconds. To correct this players perform something known as ‘the split’. The specific impact of an effective split is allowing you to start production of your second worker as soon as the first finishes. Take note: Start building your first worker before you send your workers to mine.

The two most common variants of ‘the split’:

  • ‘The Half and Half’ – Box all six workers and send them all to a mineral patch to the left of the middle, then as they are traveling box select three and send them to a patch on the right side of the middle. The workers will still have to sort themselves out but much less so than normal. This method is popular because it is relatively easy if you are fairly accurate with you mouse.
  • ‘F1 and Send’ – This method speaks for itself, simply press F1 to select a single worker and then send him to a mineral patch. Repeat for each worker, sending each to their own mineral patch. This method is less popular than the ‘half and half’ method because it requires you to be fast and accurate enough to do effectively.

In the beginning practice each a few times against the AI and select whichever one you find the most comfortable. Over time you will find that you will naturally develop your own version of one the above methods.

Edit 1/7/2011: A helpful reader, Jeffery, pointed out that a study of split has shown that the benefit gained is very small. As such, it’s entirely possible for you tip skip this tip completely. I have decided to continue splitting my workers anyway, a decision that seems to be echoed by others. I find it a fun way to start the game and it has become a part of my warm-up routine. It’s also wise to not underestimate the power of being a little bit fancy. Thank you, Jeffery, for the helpful feedback! It goes a long way towards making my site a better place to learn SC2.


Rallying Your Workers Correctly and Creating ‘Worker Pairs’

Rallying the first two workers that you build to empty (not being mined from) mineral patches can give you an extra economic advantage at the beginning of the match. At that point in the game you are not usually doing anything else anyway so there is no reason to not do this.

The second part of this is creating ‘Worker Pairs’. Worker pairs are two mining workers that are perfectly in sync, that is, right as one worker finishes mining the other one begins. Workers will eventually pair up themselves, but only after considerable shuffling about. You can manually create a worker pair by rallying a worker that is about to finish building to a patch that has a worker that is just about to finish mining. This will take some practice to get the timing down. You should only worry about this if you are not doing anything else at the time. Although it will help your income it is not significant enough to get distracted over.


‘Maynard Transfer’

Try to time your transfer so they start mining right as it finishes. Profit!

Named for its creator, the Maynard transfer involves overproducing workers at one base so that you can transfer them to an expansion base when it completes. Transferring workers in this way means that you can start reaping the economic benefits of an expansion immediately.

This technique is the standard now for nearly all top players and you should be doing it too. Simply continue producing workers at your main base and then transfer over 10-15 workers from your main to your expansion. Do this every time you expand and your economy will never dry up. This is also another great reason why you should never stop building workers.


Starting Buildings Right on Time

This is one of those things that will really make a noticeable difference, namely in how fast you can execute your build You want to start construction of each building at the exact moment that you have enough resources to do so. Basically, you always want your workers to be building right underneath themselves, every second spent travelling to build is wasted time.

In order to do this send your worker out to where you want to build the building before you have the correct amount of resources. Ideally you want your worker to arrive right as you get enough to build. But this sort of accuracy takes experience and practice, so don’t stress too much if you don’t get the timing right at first.


Giving Your Ranged Units Space

This one may not be as little as the others, because it can provide a great number of benefits. What happens normally is that your units will get rallied to a point in or just outside of your base where they end up in a big bunch. The problem with this is that they have no room to manoeuvre around or retreat if the opponent attacks, severely limiting their effectiveness.

It is much better to get into the habit of moving your units out towards your enemy, particularly if they are ranged units. Doing so gives them room to move around, gives you the space to kite enemy units (attack while staying out of range of their attacks) and it gives you an early warning of incoming attacks. Once you do spot an attack you can simply pull back to defend. Doing this has also seemed to help with breaking the passive mindset that has been a problem for me since I first started playing.

In Daily #189 “Newbie Tuesday: Losing to Early Pressure” Day[9] discusses how moving out with your units can help you deal with an early attack. Definitely worth checking out if this is a problem for you.


Stalkers out range Marines so you should always move them out against Terran.


Compensating for Lacking Hand Speed

This is a technique that you should employ if you find that you are simply not fast enough to keep up with the build you are trying to perform. If you are not fast enough what happens is that your resources will begin to build up simply because you cannot build as fast as the person who created the build. Remember, not everyone can play as fast as the pros. The problem is that most new players will not compensate for this difference in hand speed and will just ignore or waste the extra resources.

All you have to do to compensate is to add an extra production facility to your build so you can spend those extra resources. It is much better to do the build ‘incorrectly’ and spend that extra money rather than to just ignore it and try to play faster. Being aware of your limitations is a good skill to have! If, over time, you find that the extra production building does not see any use then you are most likely getting faster and you don’t need to compensate any more.


How familiar were you with the tips in this article? If you know of any more let me know in the comments below, I’d love to hear them!