In this StarCraft 2 guide SC2Cha0s goes back to basics on the game's mechanics to make you a better and more competitive player overall.
Starcraft II is a very challenging and invigorating game that can take years to master. This article will be the start of a companion guide to a video series that was started this week. Today, we will be venturing on a journey to master the art of control groups and location hotkey. Utilizing these tools in SCII will greatly increase your ability to multitask as well as become more efficient at managing your base.
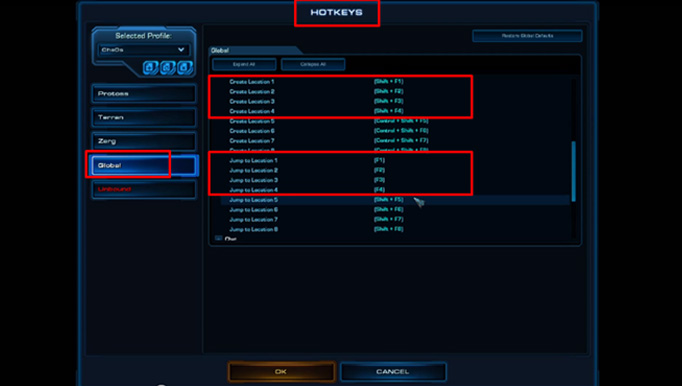
Before we get started, I suggest you open up your settings within Starcraft II and follow along this simple guide of setting up location hotkeys. Once logged in, go to:
Settings -> Hotkeys ->Global -> Camera.
Once here you should see a screen similar to the picture below.
If you scroll down a bit, you will notice that Locations can be created using the key combination Ctrl+Shift+F1. Personally, I find this combination of key a little difficult to utilize. I have found that changing this bind to simply Shift+F1 makes these hotkeys a lot easier to utilize. Since I only use 4 location keys, I change locations 1 – 4 to this binding. Once that is complete, if you scroll down a bit more you will find the “Jump to Location #” hotkeys. I would recommend changing these to the simpler F1 – F4. This allows you to instantly jump to a location that has been set up by pressing the F1 – F4 (depending on which location you would like) key. Once these are set up, you are ready to give them a try. Start a custom game and gives these new bindings a try before utilizing them on the ladder.
The next topic I would like to discuss is Control groups. Control groups allow you to assign a group of units or buildings to a number key for easy access. For Example, at the beginning of every game (before the auto glhf), I tend to click the nexus build a probe and immediately hit Shift+4. This binds the nexus to the number “4” key and allows me to easily continue to build probes throughout the game.
Once a unit or building is bound to a number, centering your screen on that unit is rather easy. By double tapping a control group, the camera view will instantly center itself around the unit or group of units. This technique allows for players to switch between multiple units of interest extremely quickly. Pro players utilize this technique to have clear vision of everything within their units’ vision.
Below is the video series episode that discusses control groups and location hotkeys. This video will help you get started with setting up the location hotkeys as well as walk through a brief demonstration.
As a requirement to this Back to the Basics series, I would like you (yes, you the person reading this) to open up Starcraft 2 and create a custom game and give these mechanics a try. Once you have given it a try, come back to this article and let me know how it went. Also, feel free to leave any questions if you have any.
For more Starcraft 2 content and updates on tutorials and live streams feel free to follow me on Twitch and YouTube:
In these episodes of Highlander's Achievement Hunters series he looks at the entire category of Custom Outmatched achievements.
100 Achievement Points Total
2 Insane AI
The first to be examined is the 2 Insane AI achievement. In this, you need to defeat two Insane AI at the same time. Luckily, you don’t need to defeat any more of these at once, but this is hard enough.
Naturally, we’re going to use our Photon Cannon rush strategy again, but like an episode if Idol, map selection can really make or break this. I find that people naturally tend to select a 2v2 map when trying to complete this, however there aren’t any in the map pool that are as effective as: Tempest.
Tempest, if you get a close spawn position that you scout first time, has an exceptionally close starting position for your two enemies. The AI also start divided from each other and both have a low ground position that has easy access to both opponents Nexus’. Ideal really!
The beautiful thing is, if you are having trouble with this achievement and find your enemy isn’t in a close spawn location, that’s fine. You can just start again. Once you do get it, you’ll find it is the easiest map by far.
Make sure you select both your opponents as being Protoss, of all three races they are the most vulnerable to a cannon rush, compared with Zerg who have creep and Terran who have such early game range units.
As per all Cannon rush strategies we will be pulling a probe off the line ASAP and sending him off to build a proxy Pylon outside the enemy base on the low ground to be followed by a Forge ASAP. Whenever you can, build and chronoboost Probes, as long as you don’t delay any structures. Once you have a Forge up, build two Cannons on the low ground with an approximate 10-15s gap between commencing the two. Try to keep your buildings designed so that it is difficult for melee units to attack you cannons, without compromising the range of your Pylon power or your Cannons reach.
Then, just before your first Cannon completes, build a third Cannon on the high ground. By the time the Probes arrive, the enemy will see the completed first Cannon and waste even more time running down the ramp after it only to find themselves out of their depth. Like dominoes, your 2nd cannon will have completed (this is why we waited 10-15s), leaving the enemy Probes having bitten off more than they could chew.
Meanwhile, keep pushing with your Cannons, leap frogging with the construction of Pylons and Cannons towards the enemy Nexus.
The important note to keep in mind, is not to spend any longer on your first opponent than is necessary. The moment the AI’s Nexus is within range of Photon Cannons (or is expecting to be once some more warp in), move onto the remaining enemy without delay.
We then use the same strategy, being a little more conservative with our Cannon usage, using 4 or more Cannons before pushing further forward with a Pylon.
If you feel you have done well, but cannot make the final push towards the enemy Nexus, not all is lost. Your last ditch effort can involve teching immediately to Void Rays and try to use Hit & Run tactics on the enemy Nexus whilst avoiding engagements with the main army. You will have some time up your sleeve while the enemy attempts to destroy your existing cannons, however they won’t last long.
4 Very Hard AI
This is a very difficult achievement to attain and luck plays a significant component, especially since the release of patch 1.4 and the Immortal range buff that came with it.
We will be playing on Megaton for this one, with all our opponents being Protoss once more.
Again, we are going for a Cannon Rush strategy but this one will be a bit more difficult.
Pull a probe off the line at about 7 supply, your objective is to get as much early game mining in as possible without getting substantially supply blocked. Then build a Pylon on the low ground of the opponent nearest the small back entrance. Get a Forge up ASAP and using the same strategy as before you will be getting two Cannons on the low ground and as they are completing get a cannon on the high ground. Whilst doing all of this and keep squeezing in Probes (using Chronoboost if available) wherever you can, you’ll find you have more scope to do so compared to the 2 Insane achievement, as the additional mining time at the start will mean you’ve had more probes mining.
Note: Earlier online tutorials recommend pushing heavily up through the middle, but this is too difficult since the AI handle aggressive structures better than they used to.
Your third Cannon (that one on the high ground) should have prevented all mining, so we can consider that opponent completely dead. The ideal mentality here is to consider the best path to take down all opponents ASAP. If we consider the nearest opponent (whose mineral line is quite exposed) our second opponent and his only living neighbour the third opponent, you should be moving towards the nearest possible point to your fourth opponent, whilst still being in range of your third. The idea being, this should make an efficient arc which has built up from your very initial cannons and will move right down the middle of the map. An easy mistake to make is to focus too hard on the next opponent and not on the most challenging end goal. In moving this way towards your third opponent, it will only take a cannon or two to completely disable your second opponent, without more than one additional pylon.
Always be sure to only build Cannons where it is intelligent to do so, it you feel you cannot place a cannon in a position where it will be very useful, simply spend the money on probes or if your mineral line is saturated then save for more cannons in the right places later.
Now, here is where the luck component comes in. Sometimes your third and fourth opponents will include Immortals in their unit mix, if that is the case the achievement is very difficult to attain. They are very effective against Cannons. By this stage, it’s up to you as to whether you continue with Cannons, or if you wish to attempt a transition at home into Void Rays with a plan to hit and run their main base. If you feel the enemy is too hard to overcome, you can always restart and hope for better luck next time.
The enemy does not do a good job of it’s expansion timing, so after the 20 min mark you should be keeping in mind that they will have or will be expanding, likely to their nearest expansion. A pylon and a couple of cannons will do the job here. By preventing this, they will be getting mined out and not have the wisdom to expand as you can.
An alternative strategy, put forward by Artreides of the Team Liquid forums is to play TvZZZZ on Lava Flow expand immediately to an island and build mass Thors to starve out the 4 enemies taking advantage of the ultra cost-effective exchange between Thors and Zerg air.
If you have a request for an achievement you would like to see covered or have any questions/comments about this one be sure to leave a comment below!
In this article we look at some of the settings in Starcraft 2 that can help improve your play.
Game settings are something people will often neglect, but optimising them is simple and it can benefit your play immediately. In this article we will go through some of the settings that you can change in-game and what they will do for you.
Display the Command Hotkeys
In a previous article I discussed the importance of learning to use hotkeys in SC2. This setting shows the hotkey for each command on the command button itself rather than the tooltip (popup box when you mouse over the command).
Benefits
Having the hotkeys for each command easily visible can make learning them just a little bit easier. Once you have learned them all you will simply forget about even looking in that corner of the screen but for now this setting is one you should definitely enable.
How to Change This Setting
To display the command hotkeys:
Go to the ‘Options’ menu,
Open the Gameplay tab, and,
Check the ‘Command Hotkey Text’ box.
The Game Timer
This handy addition to the game simply puts a timer above the mini-map in the user interface. This timer shows the current time of the match in Starcraft 2 time (1.38x Normal time on the ladder).
Benefits
The game timer may seem unimportant but it serves as an easy point of reference whilst in game. This allows you to note timings and have an idea of what you could see from your opponent at certain points in the match. You can also set times for yourself to aim for with certain things. For example, in Protoss vs Zerg I try to expand by 6:00, referring to the game timer lets me know if I have been delayed and by how much.
How to Change This Setting
To enable the Game Timer:
Go to the ‘Options’ Menu,
Open the ‘Gameplay’ Tab, and,
Check the ‘Show Game Timer’ Box.
Enable Friend or Foe Colours
Rather than their random colours, the enemy is shown as red and you as green.
This setting is one of my personal favourites. Changing this setting changes the team colours from their defaults to green (yourself), red (enemies) and yellow (allies).
Benefits
Friend or foe colours make identifying enemy units via the mini-map and main screen much easier in 1v1 games. I am still undecided about it’s usefulness in team games, however, as it makes communicating with your allies a little difficult as all enemies are red. Being able to quickly identify the enemy will make it much easier to spot drops or enemy troop movements in your peripheral vision.
How to Change This Setting
To enable/disable friend or foe colours press ‘Alt+F’ whilst in a game. Alternatively, you can click the bottom button besides the mini-map. Your friend or foe colours setting will carry over into future games so you do not have to enable it every game.
Disable Operating System Shortcuts
This setting is worth changing if you have a problem with accidentally hitting a button that minimises the game or interferes somehow. If you don’t have a problem with this don’t worry about this setting.
How to Change This Setting
To disable the operating system shortcuts:
Go to the ‘Options’ Menus,
Open the ‘Controls’ Tab, and,
Check the ‘OS Keyboard Shortcuts’ box.
Show Unit Status Bars
It may look messy as a viewer but as a player the status bars provide a lot of vital information.
Enabling the display of unit status bars will show the health, shields, energy and production status of all units and buildings on the main game screen.
Benefits
Makes it easy to see the condition of your units so that you can make a decision to micro or retreat.
You can see the condition of enemy units allowing you to focus fire them easily.
Allows you to easily make out enemy spell-casters to focus fire, EMP or Feedback.
Allows you to easily see the current production or research status of any of your buildings, assisting with macro.
How to Change This Setting
I highly recommend setting the display of unit status bars to ‘always’, however, if you find this too messy you can set it to ‘selected’. You can change this setting by:
Going to the ‘Options’ menu,
Opening the ‘Gameplay’ tab, and,
Selecting ‘Always’ or ‘Selected’ from the drop down ‘Show Unit Status Bars’ menu.
Un-clickable or Hidden Control Groups
If, like me, you find yourself accidentally clicking the control group icons at the bottom of the main game screen or you just want to get the most amount of screen space possible this is a good setting to change. There are two options available to you instead of the default visible and clickable setting: Visible but un-clickable or hidden.
How to Change This Setting
To set the control groups to unclickable or hidden:
Go to the ‘Options’ menu,
Open the ‘Gameplay’ tab, and,
Select either ‘Hidden’ or ‘Unclickable’ from the ‘Control Groups’ drop-down box.
Display Build Grid
The build grid shows unbuildable terrain as yellow allowing for easier wall offs.
Enabling this setting will show a grid whenever you attempt to place a building. The grid shows unbuildable terrain and gives you an idea of how much space there is betweeen your buildings.
Benefits
The build grid makes walling off and base planning much easier. For example, as Protoss you need to leave a one square gap in your wall for units to pass through. Enabling this setting will help you set up your base just a little better so give it a try.
How to Change This Setting
To enable the display of the build grid:
Go to the ‘Options’ Menu,
Open the ‘Gamelpay’ tab, and,
Check the ‘Display Build Grid’ box.
How do you set up your game? Are there any useful settings that I haven’t mentioned here? If so let me know in the comments below!
This article was a collaborative piece between ZiggyD and Ramzdale, a big thank you to Ramzdale for his help! If you are an aspiring writer and would like to write for LearningSC2 let me know!
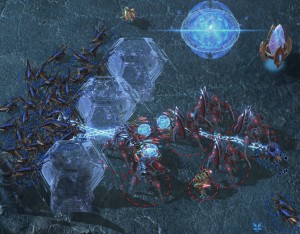
In this article we look at possibly the most valuable tool in the Protoss' arsenal: the Force Field!
The Sentry’s Force Field ability is probably one of the most important tools Protoss has. It can be used to defend when an early attack could not otherwise be defended or to assault your opponent while forcing their army into a bad position.
Games can hinge on good Force Fields, it’s not uncommon that an incorrectly placed Force Field will cost a Protoss player the game. It is crucial for your progression as a Protoss player to at least have a decent grasp on Force Field use.
In preparation for this article I looked at a lot of games from three professional players well known for their near-perfect Force Field use: White-Ra, iNcontrol and oGsMC. I have also been doing a lot of work on my own Force Field use, with great results.
How To Cast Force Field
Assuming ‘F’ is the hotkey for Force Field (F is the Default) the to best ways to cast it are:
‘F’ > Click each Force Field individually, or,
Hold ‘F’ down and click for each Force Field you want to cast.
This is purely personal preference, I use the first option because I feel it makes me place each Force Field a little better than if I use the second option. Try both and decide which is more comfortable for you. Do not ‘Shift+F’ Force Fields as it causes the Sentries to cast after they kill the current unit that they are attacking.
How Many Sentries are Needed?
The following is based on my experience and my observations on professional Protoss players. I give a range of recommended Sentry counts so that you can adjust depending on how good your Force Field placement is. If you are not confident that you can be very efficient with your Force Fields use the higher Sentry count suggested.
When defending one base with a ramp 3-4 Sentries is enough to block the ramp for as long as you want.
When moving out to take an expansion a minimum of eight Sentries is recommended against Zerg. Eight will allow you to have enough Force Fields to easily defend any Zergling attacks and small Roach pushes for a good amount of time.
When moving out to attack or secure further expansions 8-10 Sentries is recommended to effectively apply the techniques discussed in this article. This is true in any matchup, especially when you are using Colossus in your army. Effective Force Fields will greatly amplify the effectiveness of Colossus.
Force Field Techniques
The Force Field ability is very versatile and its uses are only limited by your creativity. The following are common techniques that you can use to great effect.
Ramp Block
This is the most simple of the techniques and only requires a bit of timing to do well. Force Fields are used to block enemy forces from coming up (or going down) a ramp. You can place the Force Field to completely block enemy troops or you can attempt cut the army in half as it comes up the ramp netting you a few easy kills.
In this game WhiteRa used a Force Field to prevent enemy Zerglings from reinforcing an expansion.
In the same game WhiteRa uses a Force Field to trap a few Zerglings on a ramp. Easy kills.
Open Field Block
Used to prevent enemy forces from engaging with your army or to prevent flanks. This technique should be used when you want to completely avoid an engagement or if your troops outrange those of the enemies, a common thing for Protoss. You can improve the effectiveness of this technique by utilising chokes, walls or buildings to help block the enemy’s movement.
Zerglings can easily be blocked by using Force Fields in the choke created by the gateway
oGsMC blocks off the Roaches allowing his Stalkers and Colossus to attack freely.
Cut and Trap
Using Force Fields you can cut an enemy’s army in half and trap some of the units to be easily killed by your Zealots. Using this method you can safely chip away at the enemy’s forces whilst taking minimal damage yourself. You can also trap any units caught off guard by creating a concave of Force Fields behind the enemy’s units. I group these two techniques together because cutting an enemy’s army is the same as trapping a portion of it. Using these methods you will never have to engage the enemy at his full strength.
oGsMC uses Force Fields to trap a few roaches that are separated from the Zerg's main army.
In this game I manage to cut a few units off from my enemy's army giving me easy kills.
Bottleneck
A bottle neck is essentially a small choke, it restricts movement to your enemy’s army and causes them to bunch up into a gap. This technique works with splash damage from Colossus or Psi Storms and it also tempts all but the most experienced of players into engaging when they should be pulling back.
The bottleneck created here forces the Terran opponent to either pull back or fight a bad engagement.
Here multiple bottlenecks have disrupt the enemy's arc and maximise the effectiveness of the Colossus.
A Few Tips
Following this advice can help you use your Sentry’s energy more efficiently and help you to have better engagements.
Troop Movement is extremely important: engaging at chokes or near walls will make your Force Fields much more effective.
As the enemy approaches throw down one or two Force Fields pre-emptively, then if he continues past those complete the cut. This makes cutting his army easier as it makes a temporary choke-point.
Try to not overlap your Force Fields, doing so wastes valuable energy that could be used on more Force Fields or Guardian Shield.
If you have High Templar in a control group casting Force Field becomes difficult, set your Sentries to a different control group to make using Force Field quicker and easier.
Calm Force Fields are well placed ones. Easier said then done. Try breathing out before you spam them everywhere.
When Force Fields DONT Work (Or, How To Deny the Protoss Force Field Use)
In the following situations Force Fields will hinder you or flat-out not work, avoid over producing Sentries if you encounter one of these.
Against Massive Units
Colossus, Thors, Ultralisks and Archons (as of patch 1.3.3) are all ‘Massive’ class units and will break Force Fields upon contact with them. If your opponent is leading their attack with these units do not Force Field, instead use your energy on Guardian Shield and Hallucinations.
Against Siege Tanks
Siege Tanks are generally stationary and have a long range, using Force Fields when facing a large number of tanks will help your opponent more than you. However, if you can, use Force Fields to prevent Terran’s units from pulling back into range of their tanks using the Cut or Trap techniques.
Against Air
Yep. Doesn’t work against air units.
When Your Opponent is Highly Mobile
This one is a little different. If your enemy is playing a highly mobile game (using fast units and drops or other harrasment) Force Fields become limited in their usefulness overall. You can still use a few Sentries to prevent some attacks but most mobile players will simply attack elsewhere. In this situation limit your Sentry production and instead focus on your own mobile units to counter or build up for an attack.
Has Force Field use been something you have struggled with or are you the oGsMC of your division? I am still having trouble with making sure that I don’t overlap them too much. Let me know about your Force Field skills in the comments below!
A special thank you to Ramzdale for helping me get a few of these awesome pics!
In this post I share some of the subtle things that you can do to give yourself an edge over your opponents in Starcraft 2.
There are many things that players do to get an edge over their opponents in Starcraft 2. Individually these wont take you from bronze to gold, but when combined they can give you a decent advantage. Normally, you would pick up these nuances through experience and by watching other people do them, but this can take a while. Instead I thought I would save you the time and just share them with you here. Aren’t I nice?
‘The Split’
A perfect 'Half and Half' split. Not mine of course.
How you send your initial six workers to mine seems like such a small thing and really, it is a small thing. If you box select all of your workers and send them to a mineral patch they will sort themselves out, but this can take a few seconds. To correct this players perform something known as ‘the split’. The specific impact of an effective split is allowing you to start production of your second worker as soon as the first finishes. Take note: Start building your first workerbefore you send your workers to mine.
The two most common variants of ‘the split’:
‘The Half and Half’ – Box all six workers and send them all to a mineral patch to the left of the middle, then as they are traveling box select three and send them to a patch on the right side of the middle. The workers will still have to sort themselves out but much less so than normal. This method is popular because it is relatively easy if you are fairly accurate with you mouse.
‘F1 and Send’ – This method speaks for itself, simply press F1 to select a single worker and then send him to a mineral patch. Repeat for each worker, sending each to their own mineral patch. This method is less popular than the ‘half and half’ method because it requires you to be fast and accurate enough to do effectively.
In the beginning practice each a few times against the AI and select whichever one you find the most comfortable. Over time you will find that you will naturally develop your own version of one the above methods.
Edit 1/7/2011: A helpful reader, Jeffery, pointed out that a study of split has shown that the benefit gained is very small. As such, it’s entirely possible for you tip skip this tip completely. I have decided to continue splitting my workers anyway, a decision that seems to be echoed by others. I find it a fun way to start the game and it has become a part of my warm-up routine. It’s also wise to not underestimate the power of being a little bit fancy. Thank you, Jeffery, for the helpful feedback! It goes a long way towards making my site a better place to learn SC2.
Rallying Your Workers Correctly and Creating ‘Worker Pairs’
Rallying the first two workers that you build to empty (not being mined from) mineral patches can give you an extra economic advantage at the beginning of the match. At that point in the game you are not usually doing anything else anyway so there is no reason to not do this.
The second part of this is creating ‘Worker Pairs’. Worker pairs are two mining workers that are perfectly in sync, that is, right as one worker finishes mining the other one begins. Workers will eventually pair up themselves, but only after considerable shuffling about. You can manually create a worker pair by rallying a worker that is about to finish building to a patch that has a worker that is just about to finish mining. This will take some practice to get the timing down. You should only worry about this if you are not doing anything else at the time. Although it will help your income it is not significant enough to get distracted over.
‘Maynard Transfer’
Try to time your transfer so they start mining right as it finishes. Profit!
Named for its creator, the Maynard transfer involves overproducing workers at one base so that you can transfer them to an expansion base when it completes. Transferring workers in this way means that you can start reaping the economic benefits of an expansion immediately.
This technique is the standard now for nearly all top players and you should be doing it too. Simply continue producing workers at your main base and then transfer over 10-15 workers from your main to your expansion. Do this every time you expand and your economy will never dry up. This is also another great reason why you should never stop building workers.
Starting Buildings Right on Time
This is one of those things that will really make a noticeable difference, namely in how fast you can execute your build You want to start construction of each building at the exact moment that you have enough resources to do so. Basically, you always want your workers to be building right underneath themselves, every second spent travelling to build is wasted time.
In order to do this send your worker out to where you want to build the building before you have the correct amount of resources. Ideally you want your worker to arrive right as you get enough to build. But this sort of accuracy takes experience and practice, so don’t stress too much if you don’t get the timing right at first.
Giving Your Ranged Units Space
This one may not be as little as the others, because it can provide a great number of benefits. What happens normally is that your units will get rallied to a point in or just outside of your base where they end up in a big bunch. The problem with this is that they have no room to manoeuvre around or retreat if the opponent attacks, severely limiting their effectiveness.
It is much better to get into the habit of moving your units out towards your enemy, particularly if they are ranged units. Doing so gives them room to move around, gives you the space to kite enemy units (attack while staying out of range of their attacks) and it gives you an early warning of incoming attacks. Once you do spot an attack you can simply pull back to defend. Doing this has also seemed to help with breaking the passive mindset that has been a problem for me since I first started playing.
Stalkers out range Marines so you should always move them out against Terran.
Compensating for Lacking Hand Speed
This is a technique that you should employ if you find that you are simply not fast enough to keep up with the build you are trying to perform. If you are not fast enough what happens is that your resources will begin to build up simply because you cannot build as fast as the person who created the build. Remember, not everyone can play as fast as the pros. The problem is that most new players will not compensate for this difference in hand speed and will just ignore or waste the extra resources.
All you have to do to compensate is to add an extra production facility to your build so you can spend those extra resources. It is much better to do the build ‘incorrectly’ and spend that extra money rather than to just ignore it and try to play faster. Being aware of your limitations is a good skill to have! If, over time, you find that the extra production building does not see any use then you are most likely getting faster and you don’t need to compensate any more.
How familiar were you with the tips in this article? If you know of any more let me know in the comments below, I’d love to hear them!