Wednesday, 22 of January of 2025

From Bronze to GrandMasters – aLtShortizz Interview

I had the chance to interview aLtShortizz about his journey from Bronze to GM.


I recently had the pleasure of interviewing Kenny ‘aLtShortizz‘ Ang, GrandMaster Zerg on SEA (Rank 87 at the time of writing) and I am very excited to present this to you.

What makes aLtShortizz’s story so exciting is that he went from Bronze to GrandMasters in a short seven months! This sort of progress is inspirational to many of us who are struggling in Bronze or even somewhere in the middle and just goes to show that players aren’t born in GM.


Hello Shortizz and thank you for allowing me to interview. First lets just have you introduce yourself!

Hi everyone, my name is Kenny Ang and I play under the nickname aLtShortizz. I am currently a GM on SEA server and Master on NA and KR servers.


You have created a bit of a stir in the SEA community for your inspiring progress on the ladders, care to share your achievement with us?

I was placed in Bronze league back in February and got promoted into GM league in August. It was something like Season 1 – Gold, Season 2 – Rank 1 Master, Season 3 – GM. Winning the Sc2SEA community open twice was also very rewarding and I got recognition through that and was eventually invited to join top Singapore clan aLt.


What made you decide to play Zerg, and, have you ever had a moment where you wanted to change races?

I played Zerg in Broodwar and naturally chose Zerg again in SC2. The Zerg mechanics were harder to grasp for me in the beginning (I tried the other races too), but I felt that with better understanding and control of the mechanics, especially the queen, Zerg has a lot of potential.

There were many times where I was frustrated and often thought that I was losing to lesser players, thus leading me to contemplate a race switch. I believe everyone went through phases like that but in order to improve, you need to stop thinking that your losing to lesser players and focus more on why you are losing in the first place. For example, I dont blame Terran OP for winning with a 11/11 bunker rush (Although I think its cheap). I prefer to take the loss as me not defending the bunker rush well enough despite knowing how to.

 “I believe in order to improve, you need to stop thinking that your losing to lesser players and focus more on why you are losing in the first place.”

What inspired you to try to get really good at StarCraft 2?

As I have stated in my Strategy guide [on SC2SEA.com], in order to improve quickly and massively, you have to devote alot of time and effort into it. After playing BW for 5 years, I was shocked and humiliated to be place into Bronze league when I did my placements. I guess that was actually a good start looking back at it now as it stirs up the competitiveness in me.


How does it feel to have progressed the way that you have? Are you happy to rest on your laurels now, or do you have a ‘next step’ planned?

I intend to at least maintain my current standard while practising a lot more with my teammates. Balancing life and gaming is very important and when a choice has to be made, everyone should put gaming aside. If you get too overwhelmed in trying to improve and play, it will consume you and thats never a good thing.


On that note, how have you balanced normal life and SC2, and, has anyone from ‘real  life’ been supportive or disagreed with what you were doing?

My GF bought me my copy of SC2 because she knew how much I had loved BW. I was hesitant to purchase it because I knew exactly how much it might consume me =P. I wouldn’t say alot of people are supportive of my practise because gaming is not really a hobby that most would look up to.

Hopefully that will change in the future!


How does a typical day of practice go for you?

When I was practising to get into GM league (always aim high) I would do 5-10 Games of custom games, watch replays of games that I lost and didn’t understand why then Ladder 5-10 games. So thats pretty much 10-20 games a day, not counting the hours I spent researching timings and build orders.

After getting into GM, I play mostly on average of 5 games just to keep myself  ‘updated’. A lot of people think that you have to consistently play a lot to reach and maintain a high level but really, all you need is a period where u have time to make a good push and then you can sit back on it and just maintain your standard.


StarCraft 2 seems to be a game that becomes deeper the more you look. What would you say has changed about the way you see StarCraft 2 since Bronze?

Being in BSG (Bronze/Silver/Gold) was actually a lot more fun compared to nowadays. There were so many players whom you can compete with and everyone does really fun and weird stuff that cracks you up! However, once you attain a certain ranking and you’ll realise that the people you are playing are usually the same. Its either a TA, nGen, aLt or SPR that you would be laddering against these days (on SEA). And quite honestly, its getting a little too boring especially when some people do the same opening almost every game.

Game play wise, being in Bronze gives you a lot of room for improvement and the satisfaction that comes with it. The satisfaction comes mostly from winning tournaments since there are very little people that you actually surpass.


What have been the most important factors in your progress?

The satisfaction of improving and beating people whom are considered the best. Also, I would like to say that being part of a community helps too. When I was hanging out with PRACBUD and ClanFaDe, they would constantly cheer me on because they want to see a GM amongst themselves. I guess that made me more proud when I achieved what me and my friends wanted.


Do you have any final tips for the Bronzies out struggling to get promoted?

Playing 1000 games everyday will get you nowhere if you do not realise your mistakes. Sometimes, listening is actually more important that playing. Search around for some useful tips and guides and try to define your ‘play-style’ from there. I strongly suggest everyone to sign up for tournaments that are listed in Sc2SEA.com. Dont just play in BSGs, join the Open tournaments too so you can have a chance to play against high level players. The only way to improve is to constantly play against better players and the look at your mistakes after you lose.

Lastly, dont be disheartened and always remember this is a game that we bought to relax ourselves. If losing too much gets to you, just walk away and come back later.

Sound advice! Thanks again for your time.


Do you have a story of triumph to tell? Let us know about it in the comments below or send us an email!


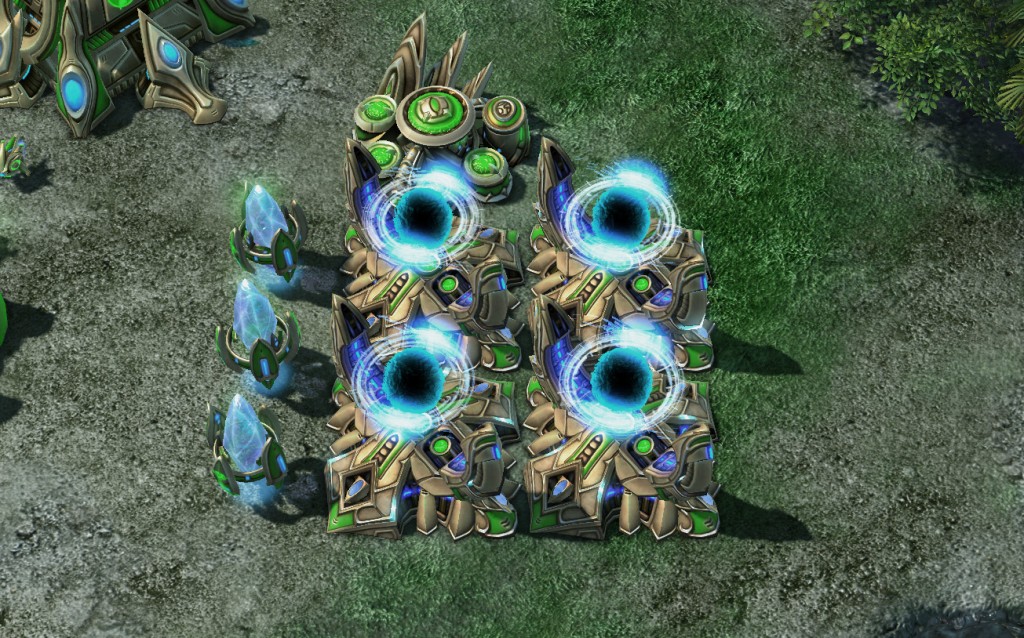
Protoss vs Protoss Anti 4 Gate

In this article we look at the 4 Gate in PvP, how to identify it, how to defend it and how to gain an advantage and transition.

Being a Protoss who wants a long PvP is a hard life. The Warpgate mechanics that make Protoss so unique and fun to play also makes for a very powerful timing attack – the Four Gate. The Four Gate gives a large flood of units early in the game and allows for an aggressive early game that can damage an opponent greatly or kill them outright. It is relatively simple to execute (although difficult to perfect) making it very popular and very hard to deal with, especially for newer players.

In fact the Four Gate can become a nightmare for some players making them dread the PvP matchup which is a shame as there is a lot of fun to be had in the Protoss vs Protoss late game. In this article I will go through how to identify a Four Gate, how to stop it and how to transition after the attack has been defended.


Scouting the Four Gate

Scouting is the most important part of beating a Four Gating player. Effective scouting will allow you to identify that they are Four Gating, gauge the type of Four Gate they are doing and kill the proxy Pylon and Probe.

Signs of a typical Four Gate:

  • Nexus has high energy – After two Chrono Boosts are spent on Probes the Four Gating player will save up energy to Chrono Boost the Warpgate Research. This is true for all all Four Gates as the faster the research finishes the stronger the attack will be.
  • Missing Pylons – Count the number of Pylons in your base then count his. Is one of his missing? It is likely hidden somewhere near your base so that your opponent can Warp units in. Although this is a common sign of a Four Gate it could also be an indicator of a hidden tech build such as Stargate or DTs.
  • Stalker and Probe (and possibly a Zealot) moving out together – This is the best but latest indicator of an incoming Four Gate. The opponent will move towards your base with these units and then build a Pylon to reinforce his attack.

Signs of a ‘Korean Four Gate’ (Pure Zealot):

  • Your opponent has removed Probes from the Assimilator – He has mined enough gas for Warpgate Research and then has stopped in order to get as many minerals as possible. As soon as you see this indicator be on the lookout for the next one.
  • Pylons in your base – This one is kind of obvious but sometimes it can be mistaken for a Cannon Rush. The opponent will put 4-6 Pylons in your base in areas that are hard to deal with.

Indicators of the type of Four Gate:

  • Gateway is down much earlier than yours – Assuming you have built your Gateway on 12 or 13 supply this means that your opponent has likely put their Gateway down on 10 supply. This Four Gate Variant hits earlier but is much less economic to the point fo being almost ‘All-in’. 
  • Two Assimilators – This is uncommon in PvP, however, if you have scouted that it is definitely a Four Gate then this means that your opponent will be building a lot of Sentries or plans on transitioning into a tech build. In this case the Four Gate may be defensive and an attack will not come.

There are two sides to scouting in PvP. Firstly, identifying the Four Gate, and, secondly, map control to spot Probes and Pylons.

Initially you want to look for the above indicators by sending a Probe to your opponents base on 9 or 13 supply. Sending the Probe on 9 is safer but is less economic then sending it on 13. Poke around their base for as long as possible to get as much information as possible. Once they start building their first Stalker it’s a good idea to pull your Probe back.

Once you have identified that the Four Gate is incoming its important to begin having as much map vision and control as possible. Check around your natural expansion with your Zealot and send you Stalker to scout around the map and to check the opponents front. Try to hold the Xel Naga towers as much as possible as this will help you spot the Probe on its way to build a Pylon. If you can spot that and kill it you will gain a huge advantage. Hold map control and the Xel Nagas until the very moment your opponent moves out then give up map control and head back to your base to prepare.


Stopping the Four Gate 

The following is assuming you are defending with 3 Gateways or a defensive 4 Gate. The following will also work with an Immortal-based defence except you will be unlikely to have as much early map control. Other builds that are specifically designed to defeat a 4 Gate will have their own methods but more often than not they will revolve around the same principles.

Before 5:50

Being active with your initial units is crucial. Send your Zealot to check for proxy Pylons near your Natural and send your first Stalker to check the Xel Naga towers and try and intercept any Probes.

If you encounter any of his units converge all of yours and try to kill them, even doing a small amount of damage will help you a lot. Be cautious not to lose anything yourself, if he outnumbers you (particularly in Stalkers) give up map control and pull back to your ramp.

If you are planning on defending with Immortals you will likely have more Zealots than Stalkers and your map control will be limited at this point, keep your Zealots near your ramp.

After spotting the Probe follow it and deny the Pylon

Holding the Xel Naga will often help you spot the Probe heading to Proxy.


After 5:50

Once you have pulled back to your ramp arrange your units in an arc at the top. Make sure you position some Stalkers to prevent Pylons from being warped in. I find it extremely helpful to put all of my units on ‘Hold’ as this prevents them from being baited down the ramp and allows you to focus on macro and Force Fields. 

It is extremely important to always have a Force Field available to block your ramp. If your Sentry is low on energy always preference warping in another Sentry over a Stalker. Six Sentries are able to Force Field a ramp perpetually but it is unlikely that you will get to this point defending a 4 Gate.

If you can split his units as they try to move up the ramp and kill one or two Stalkers each time you will get ahead on Stalker count very quickly. This puts you in an excellent position if he pulls back. If he continues to try to win with the 4 Gate you can just keep Force Fielding and gaining small advantages.

Units on Hold at the top of the ramp.

Cutting a small amount of units with the FF maximizes your defenders advantage.


Transitioning with an Advantage

 After defending a 4 Gate you should have at least one of the following advantages:

  • Economy/Probe advantage,
  • Gas/Technology advantage,
  • Unit advantage.

Keep in mind whilst defending how you can work towards these advantages. For example, in a defensive 4 Gate situation you should be aiming for a slight Probe advantage by building a few as you defend. You should also be trying to get the Unit advantage by cutting his army on the ramp while not losing too many of your own units.

In a defensive 3 Gate situation you should be getting as much gas as possible and maximizing your Stalker count while remaining safe with as few Sentries as possible. The extra gas you have collected can then be used to transition to Blink Stalkers, a Robotics Bay or a Starport.

Other openings will have one of the above advantages as its main goal. It is important that you identify this and think about how you can work towards that goal. 

In the Protoss vs Protoss early game you will have to be comfortable gaining and keeping a very small advantage. Having a few extra Probes or a bit of extra Gas will secure you a long-term victory but it can be easy to lose that advantage if you try to move too quickly. Holding a small advantage is more important then gaining a large advantage or even getting a quick kill.


Things to Note

No matter which build you are using the smooth execution of your opening will play a big role in your success. Early supply blocks will result in a loss when facing a 4 Gate (or any rush for that matter). As such, it is important that you practice your opening against the AI or a friend until you can do it without any errors. Remember, it will be a lot harder to perform a flawless opening when you are being attacked.

If you Chronoboost your Gateways instead of Waprgate research you will have an easier time gaining early map control and denying Proxy Pylons. Unless you are defensive 4 Gating it is a good idea to do this.

Denying the first Pylon can set the opponent back by 10-20 seconds and one Zealots worth of Minerals. It may be worth sacrificing your initial Zealot to do this.


Additional Resources 

  • Replay – A replay of a ‘Textbook’ 4 Gate defence showcasing some of the ideas in this article.

  • Build – Safe PvP 3 Gate build.

  • Opening – Triple Stalker rush. This opening is built around the idea of gaining early map control to deny the 4 Gate.


Have you had a lot of trouble with the 4 Gate in PvP? If you have any tips or advice to add or if you found this article helpful please leave a comment!


Coach Review – Quilliam NA Protoss

I interview and review a Masters Protoss coach on the NA ladders - Quilliam.

I first found Quilliam on Reddit offering his coaching to the community for a very reasonable price and this immediately grabbed my attention. In his post Quilliam noted that:

“You don’t necessarily need a pro-level coach to improve your game dramatically, especially for the hourly $ value.” – Quilliam.

Prior to reading this I had been thinking about the idea of beginner-oriented coaching at beginner-accesible prices. So finding this post was very good timing and I promptly contacted Quilliam about his services. 

I decided to ask him a few questions about his coaching:

“How would you describe your coaching style? And, how would you describe your play-style?

First and foremost, as a coach I always try to focus on the underlying reasons behind both our larger strategic goals as well the finer points of play such as building placement, production order, etc. I feel that players are given an opportunity to improve most when they understand why the game plays out like it does. I’ve watched many coaching sessions on the pros’ streams, and have always been baffled at the prevalence of “build this. now build that. no, move that here. now build this.” style coaching. In my experience, this affords no time for the student to actually absorb this information, let alone begin to think about WHY it’s being recommended.

As far as my play style is concerned, I’m definitely a macro-oriented player. I believe I have strong micro, though, so I get my “kicks” by mixing in the occasional risky pressure build! Most of the time, however, I’m obsessively searching for the safest, most optimal play at any given stage of the game.

“I first found you on Reddit offering very reasonably priced coaching for people below Masters level and this piqued my interest. Tell me why you decided to do this?”

I consider there to be a saturation of professional and semi-professional coaches with high visibility, either through reputation, tournament results, or streaming followers. I’m not one of these people. While I remain very passionate about Starcraft, it’s still just a hobby for me. That being said, it’s a hobby that I pour a lot of time and effort into, and I wanted to find a way to pass that on! Am I Grandmasters? No. Am I about to tear up the open bracket of MLG? Not any time soon, but unless you’re in Masters or above, you don’t necessarily need a pro-level coach to improve your game dramatically (especially considering their hourly rates). I’m a patient and thoughtful coach who takes a structured, digestible approach to improving your game, and I get a lot of personal satisfaction from seeing my students improve!

“How do you think coaching can help newer players?”

I’ve often seen this very question posted on several forums. Generally speaking, I believe that anyone with enough motivation and time on their hands (emphasis on time) can become an incredible Starcraft player by poring through strategy forums like TeamLiquid.net, watching resources like the Day[9] daily, and playing a ton of games. Hiring a coach to give you personalized and specific guidance, however, greatly speeds up this process, and, as long as your coach is worth their salt, will result in a much more efficient learning process.

“It takes a fair bit of love for the game to get where you are and to want to teach others, what makes you love StarCraft 2?” 

The best way that I’ve heard Starcraft 2 described goes something like the following: at its best, Starcraft requires the mental strategy of a grandmaster chess player coupled with the dexterity of a concert pianist. I find that Starcraft 2 imbues an obsessive desire to become a better, smarter player into even the most casual of gamers, and it’s precisely that quality which excites me so much about the game. I love the coaching process, and I get immense satisfaction from using my experience to help newer players who feel overwhelmed by the game.


Review

After hearing Quilliam’s responses to my questions I was excited to give him a try! I decided I wanted to my worst matchup at the moment – Protoss vs Terran, specifically, dealing with the ‘1/1/1’ timing attack that is so popular on the ladders right now. 

The Session

Quilliam began the session by asking me how I usually begin a PvT. He then had me play a game against to see where I was at mechanically and so that we had a replay to work off. While we watched the replay he asked me a few questions about the matchup. Through this we discovered that my weakness in the matchup is derived from not knowing how to scout the Terran and how to react to what I see. This part of the coaching took no longer than 10 minutes.

Quilliam then jumped into a game versus the AI to show me a solid opening and a few ways of scouting the Terran. At key moments he would pause the game to discuss what could be happening at that moment and how I could react. This was very helpful as it gave me time to think about each situation and to ask questions.

Next Quilliam had me attempt to execute the opening and to simulate a few of the scouting techniques that he showed me. After this I had a few questions which he was able to answer easily.

We quickly jumped into another game to see how well I could identify and react to his 1/1/1 timing attack. Using the techniques he showed me I was able to easily identify the 1/1/1 and reacted well only losing to a very deadly supply block which we identified afterwards.

The hour-long session was very smooth from start to finish and no time was wasted organizing anything.

Coaching Style

Quilliam takes the traditional ‘watch me then emulate’ coaching style and adds in a few very nice touches. Pausing during his demonstration to explain and allow me to ask questions was very helpful. We also spent a good amount of time discussing the ‘why’ behind the opening and scouting techniques. As an analytical player I really appreciated this. As he stated in his interview Quilliam did not simply “bark orders” at me.

Right from the very beginning it was easy to easy to tell that Quilliam has had a lot of experience coaching. He was very well organised and knew exactly how to tackle the problem I was having. It is also worth noting that he was very friendly and good humoured. 

Overall Value

Quilliam does not have the knowledge and experience of a high-level professional StarCraft player but I never felt that this impacted his ability to help me with my specific problem. His experience in coaching and professional style made me forget the notion that he might be lacking in knowledge very quickly.

Unfortunately Quilliam does not offer a video recording of the session like some players do due to hardware constraints but said that he would like to in the future.

At such a reasonable price the value of the hour of coaching that I got from Quilliam was easily comparable to an hour that could be had with a much higher level coach. What I learned in this session has easily saved me 10 hours of practice and study. 


Contact Quilliam

For prices, availability and student testimonials you can check Quilliam’s coaching page at SCVRush.com


If you’re a coach and are interested in being reviewed on LearningSC2.com please contact me!


Achievement Hunters: 4v4 Kin vs Insane AI & Insane AI Kin

In this episode of Highlander' Achievement Hunters series we look at how to get a sweet 160 achievement points!

In this episode of Achievement Hunters Highlander looks at how to get the 4v4 Kin vs Insane AI and 4v4 vs Insane AI Kin achievements. To clarify, the achievements for being all the same race and for defeating all of the same race against the Insane AI.

This achievement is one which can seem quite challenging, but if you know your way around and a few bits and pieces, it’s really quite easy. The pay off is good too, for if you take the lessons and apply them to each difficulty and the similar 3v3 achievements, you can get a quick sweep of 160 achievement points!


Background

Before I get stuck into the achievements, I’ll let you in on a little interesting fact that should not be used in a balance argument! On all difficulties when the match is even a Terran AI will always beat a Protoss or a Zerg AI, and a Protoss AI will always beat a Zerg AI. Or, simply put.

Terran AI > Protoss AI > Zerg AI

Precisely why this is the case I think has to do with how the AI engages, the challenges for it using melee units and it’s type of air units not giving it the vision it wants of the high ground. But, we won’t go too deep here, you just need to know the principal.

For both of these achievements, we are going to be playing on the map Megaton. Why this map? Well, when you are Protoss it is the best available map for good cannon rushing positions. For when playing as Terran or Zerg on Insane difficulty, it is ideal to have your opponents close together.


How To

The first of these achievements is the 4v4 Kin vs Insane AI.

To achieve this, we need to play as 4 Protoss, 4 Zerg and 4 Terran against any combinations of Insane AI.

The second of these achivements is the 4v4 vs Insane AI Kin

To achieve this, we can use any combination of races but must defeat 4 Protoss, 4 Zerg and 4 Terran.

So, the quickest way to achieve both of these achievements in only three games is to play these as complete mirror matches. That is PPPPvPPPP, ZZZZvZZZZ and TTTTvTTTT.

When playing as Protoss you will be using the Cannon Rush strategy found in the first video in the series: Achievement Hunters: Insane AI 3v3 Co-op Streak (http://learningsc2.com/achievements/achievement-hunters-insane-ai-3v3-co-op-streak/). You will be able to take out one opponent with ease and be able to start putting pressure on a second opponent while you wait for your teammates to build up and come to dominate the rest. Once your Cannon Rush strategy isn’t worth persuing any further, you should transition to Void Rays and be mindful of sticking together with you allies and giving them vision of the high ground when they foolishly don’t try to.

When playing as Zerg, you will need to use the aggro Extractor strategy to distract the enemy. Take a drone or two ASAP and use them to build extractors in the opponents base. They will send Drone’s from miles around to take out such a terrible threat. All you have to do is cancel just before it dies and get your drone back on the geyser as an extractor before it gets killed. Repeating that well should be enough to give your teammates enough of an advantage to win. Once they have Zerglings out or your trick fails, you can transition to either Speedlings or Mutalisks and harass any attempts the enemy makes to expand and be mindful to help your allies out with some high ground vision.

For Terran, it gets a little bit trickier.

When playing as Terran, you’ll want to use a very similar to the aggro Extractor strategy however instead of an Extractor you will use a Supply Depot (or Engineering Bay if you can spare the extra minerals) and put these buildings on the high ground at the main entrance to the enemy base. That will create a reacion from all four enemies, so you need to watch your SCV very closely to use the Halt (T) command at the first sign of trouble and have him run away.

After you cannot persue that strategy further rush to banshees and ask your allies (using the button in the top right hand corner) to send you gas as soon as the game reaches 5mins). Focus your efforts on supporting your allies, harassing expansions/mineral lines and giving vision of the high ground.

I personally found trying to use this strategy significantly harder in a TvT environment than the other mirror match ups.

As a result, instead of playin this as a mirror, for anyone who finds this difficult you can do the following as I did:

For the win playing as all Terran, you can do this playing against four Zerg (TTTTvZZZZ). Still follow the same steps as above, but you won’t need to do this as well as your Terran buddies will have the race advantage over Zerg which I mentioned earlier.

For the win playing against all Terran, retain your Terran allies, but you yourself can select Protoss (PTTTvTTTT) Just use the simple Photon Cannon rush to neutralise one of the Terran opponents. After that, as before, you can just tech to Void Rays to help out.


Other notes

This set of achievements is unique in one way, defeating the Insane AI will not grant you the achievements for the lower difficulties. This was changed in a later patch so that you now have to fight with even allies/opponents at each level.

None of the aggressive tricks to distract workers will work below Insane difficulty however the other strategies remain valid. If you are ever having trouble defeating a Kin team, just remember that the strongest team is TTTP with you as Protoss using a Cannon Rush. If you are having trouble using a Kin team, don’t forget that ZZZZ are the weakest opponents.

When you aren’t using the aggressive trick, Outpost likely becomes the favourite map for a 4v4 as it divides your opponents making them easy to conquer for your more organised team (that is, a team where at least two armies stick together (you and at least one AI)).

For the similar 3v3 achievements you will want to pick Cinder Fortress on Insane difficulty or Frontier on lower difficulties.


Patch 1.4 Update:

As Zerg:

Insane AI Workers no longer react to a gas steal, however for this achievement using an Evolution Chamber is just as effective.

For best results, place it as close to a wall/mineral line chokepoint as possible. It will help it to last longer and make your life easier to keep the drone alive before rebuilding. Don’t forget that if it looks trapped, you can use the Mining-Pathing Trick (by clicking on a mineral patch your workers will not be blocked by enemy units and pass straight through them).

As Terran:

Insane AI Workers will now persue your SCV forever unless they are distracted by another target. Use this to your advantage and run your first SCV all over the map until you or your allies have an army and can trap them. Whilst you are doing that with your first SCV, take a second to distract another wave of workers with the same trick.


Replays

PPPP v PPPP 
ZZZZ v ZZZZ 
TTTT v ZZZZ 
PTTT v TTTT 


If you enjoyed this or any of Highlander’s guides or if you have a suggestion for an achievement you would like to see covered let us know in the comments section below!


Starting to Journal My Games via Tumblr

I have started a new project which I think has a lot of promise!

I have been reading The Art of Learning by Josh Waitzkin for the past few days and it has inspired me to do a number of things, Starcraft related and otherwise. One of these things was to begin writing down my thoughts on each of the games I play. Waitzkin talks about doing this for all of his pursuits and how it helped him in the learning process. At first I thought this was overkill but the more I thought about it the more I felt like giving it a shot.

So far i’m finding that I am thinking a lot more analytically about my games and that making myself write down my thoughts about each game is forcing me to develop my ideas a lot more. It is quite easy to think something, like “Walling off with Gateways and Cannons really helped in that PvZ” and then forget it and not really learn much from the lesson. The act of writing this thought down really helps to solidify this lesson and I am even finding that I will sometimes take another step in the analysis, “The mineral investment in walling off with Gates and Cannons made me quite defensive in the mid-game, but the extra production and counter-attack defence really put me in a strong position in the late-game”.

To give this project the best chance of working I set myself out a few guidelines:

  1. My entries had to be simple, no long winded analysis.
  2. Make an entry after every game.
  3. Read back over the days games when I am finished.

The first one was hard since I am used to writing full length articles, to make this easier on myself I decided to host the journal on Tumblr rather than this site. Doing so gave me a separate place that was much less formal. If your going to start doing this I suggest having a place to write that is separate from everything else, a place that is just for Starcraft.

The second point was easier than expected. It seems that taking the time after each game to write out a few thoughts has given me a break and a chance to think things through. I don’t know if I have been playing better, but I certainly feel like i’m learning a lot more and that is the main goal after all.

To organise all of these entries I am using two things: 

  1. Some basic Journal software – I am using Memoires but anything that can support multiple entries and that is organised by date will work. Having a search function is handy for going back over your notes. 
  2. A publishing platform – I am using Tumblr because it connects with Twitter very well and is fairly simple to use.

You can check out my Starcraft journal entries at my Tumblr or by following me on Twitter. If you are interested in doing a similar project let me know, I would love to hear about your experiences!


Achievement Hunters: Left 2 Die – Brutal and N2D Mode

Highlander's Achievement Hunters! This time Highlander looks at all the achievements associated with Blizzards custom game: Left 2 Die.

In this guide, we will be looking at all of the achievements relating to the Blizzard Left 2 Die custom game. This is a really fun scenario which is based on the Wings of Liberty campaign mission Outbreak. Whilst there is one map, there are actually two different game modes. The first is based on the campaign mission with three degrees of difficulty (Normal, Hard and Brutal) where you have to destroy all the Zerg structures. The second mode is a pure survival mode known as Night 2 Die. Both modes are better played with a partner because of the extra 200 food and the extra control this allows you. It’s also a lot more fun with a friend.

We will be aiming to complete all of the normal achievements in one sweep as we defeat the mission on Brutal difficulty before the fifth night. In doing so we will earn at least 40 achievement points and probably another 10 plus a portrait for killing the Stank without taking any casualties. In the second section of this guide we will get another 30 achievement points for surviving level 15 of Night 2 Die mode.


Map Layout

The map consists of your base surrounded by enemy Zerg and Infested Terran structures. Each player has one main entrance which is initially open with only a Bunker for defence. At the 2 o’clock and 8 o’clock positions there are alternative entrances blocked by debris which only hold back the Zerg Swarm for so long.

Outside of your base there are many Zerg and Infested structures which produce hordes of attacking units by night and must be destroyed by day to fulfil the victory requirements. Most groups of structures are defended by one or two bunkers full of Infested Marines that can deal out a good bit of damage until their bunker is destroyed, exposing them to the sun.

At the 1 o’clock position there is a Zerg base that is guarded by two Bunkers, three Mutalisks a few Roaches and Hydralisks. Killing the Hatchery will prevent these Zerg units from being re-spawned, so be sure to kill it in one go.

At the 5 o’clock position there is another Zerg base that is defended by two Bunkers on the high ground, Spine Crawlers and a mix or Roaches and Hydralisks. This is definitely the hardest point int the game to break and is best saved till last.


Brutal Difficulty

First Night

On the first night you will be subjected to numerous Hunterlings and two Kaboomers. Be sure to keep unit production up and get Bunkers on both sides of your entrances ASAP.

Hunterlings are the biggest danger on the first night. In addition to using focused fire whenever you see these, a couple of strategies can help minimize the damage they do. By keeping your units focused at one point on the high ground you will be able to dispatch the Hunterlings with minimal losses. Alternatively, try using only a Bunker on the high ground. Without the presence of an attackable unit the Hunterling will be unable to use its powerful leap ability.

Be ready to move out again by the end of the night, you want to make the most of every second of daylight if you want to succeed.

Second Night

On this night the Swarm will break through the rocks at the 1 o’clock position. One Planetary Fortress will hold this pretty comfortably for a night with only a little support/repair.

You will soon be faced with a mob of five Hunterlings followed by your first experience with dealing with Spotters. Be ready at the 12 minute mark as one Spotter will head directly for your Command Centre followed by a pair of Hunterlings at the 13 minute mark.

Third Night

On this night the Swarm will break through the rocks at the 7 o’clock position. You should be building up more forces now and should post some troops to this entrance. A Siege Tank or two can be especially helpful here as the high ground is a little further away from the action. 

You will have two separate waves of Hunterlings come directly to you Command Centres by this night, so if you haven’t already, upgrade this to a Planetary Fortress.

Fourth Night

This is the last night that we need to survive so the principle concern is maintaining as much of an army as possible to destroy all the remaining Infested structures. So if, on this final night, one of your entrances is breached pull your army back to a single point and allow some of your now redundant production buildings to be sacrificed.

The only enemies worth considering on this final night are the two Stanks. One will come early in the night and another quite late. When the first Stank strikes you should still be in pretty good shape, so make sure you move all available troops to his location quickly to take him down. Again well placed structural defences and quickly moving SCV’s to repair are the key here. If done right you should be able to kill the Stank without any losses granting you the achievement and Stank portrait. When the second Stank arrives be sure to focus fire it down as it will not die quickly from the sunlight and will waste important day-time.

Once the fourth night is complete move out for the quick win, this is your last chance so send all of your SCV’s and empty your Bunkers and kill all remaining infested structures.

Upgrades

The upgrade path is best started with Medics and Bunkers (the two players you have enough to afford these at the same time). This tech path is best because you will be focusing on infantry due to their free and easy healing and mobility once Stimpack is researched. The next upgrade worth taking is Siege Tank (resource share to get this tech ASAP) as it will help greatly with defence. The next upgrades you take depend on what you are having the most trouble with. If you are having trouble destroying the Infested Structures Reapers and Hellions are good choices. If defending is the main problem for you then Goliaths and the Reactor-Lab are the best choices.

Other Tips

  • Get started straight away! Your initial units include Vultures and some Marines. Use the Vultures to destroy any Bunkers on level-ground as they can out-range the infested Marines inside. Use you Marines to start killing any undefended Infested Structures.
  • Make sure you use Stimpack plenty throughout the day but make sure to have some Medics with your infantry to keep healed up.
  • Don’t take on the Hatcheries unless you have sufficient time and forces to take them out in one go. The Hatcheries will produce more Roaches, Hydralisks and Mutalisks if they are left standing.
  • Don’t be afraid of Nydus Canals as you will have completed the mission before they even begin appearing.
  • Save the 5 o’clock Hatchery for last and make sure you work your way to it from an anti-clockwise direction so that you aren’t taking on the defences from the low ground.
  • Don’t be afraid to use the pause button. If you select the Science Lab before pausing you can see all of the tech choices while paused so you can discuss how you will proceed with your teammate.

You can grab the original replay of this guide here : http://www.sc2replayed.com/replay-videos/11910


Night 2 Die Mode 

This mode gets insane pretty quickly so I will just keep this guide to the basics. You will need to survive for 45 minutes and attacks remain pretty constant but there are a few key times to note:

  • 00:45 – You start to see Hunterlings at your main entrances so be ready. Keep your forces together on one part of the high ground and use only structures for defence on the other high ground.
  • 07:00 – Start getting a Planetary Fortress at the northern alternate entrance, the Swarm will break through at 10:00 and it takes 2:30 to build a Command Centre and upgrade it to a Planetary Fortress.
  • 07:10 – Start upgrading your main Command Centre to be a Planetary Fortress if you can afford it as Hunterlings are on their way. If you cannot do this in time have some troops ready to defend by 8:20.
  • 10:50 – Start getting Missile Turrets up and position your Marines, Spotter start coming to your main entrances at 11:30 and your Command Centres at 13:30.
  • 13:00 – Start getting a Planetary Fortress at the Southern alternate entrance, the Swarm will break through at 16:00.
  • 20:00 – The first Nydus Worms will appear. From now on need to start trying to get defences within your base, not just at the entrances. Set up Siege Tanks so that they cover as much of your base as possible. Setting up additional Planetary Fortresses in your base will also help. You will be attacked by Nydus Worms at the 24th, 32nd, 38th, 41st, and 44th minute marks. Make sure you kill the last Nydus worm ASAP as the game will not declare victory until it is destroyed.
  • 23:00 – The first Stank will appear. Killing the Stank is the highest priority and be proactive about pulling SCV’s to help repair. Additional Stanks will attack at the 27, 33, 36, 39 and 43 minute marks.

Upgrades

The upgrade path is best started with Medics and Bunkers (the two players should reach these at about the same time). After this you will need Siege Tanks (resources share to get this ASAP). Fire Suppression Auto Repair and the Reactor-Lab are are the next best steps and will help more as the game progresses. Goliaths are excellent for defending against Spotters and are the next priority, once you get them disperse them around your base for maximum air coverage. After these the upgrades do not matter as much so get whatever you like (but leave the Flame Turrets for last).

Other Tips

  • Be mindful of your building placement, once the Nydus Worms start to attack mobility will be essential. Put production and upgrade buildings at the outer edges where possible to leave room in the middle.
  • Have one player focus more on Mechanical units and the other on Infantry. This will maximise the effectiveness of any upgrades researched.
  • Make sure to research all of the upgrades even those you don’t need. You will get a bonus for the extra Biomass you earn and cannot spend.

You can grab the original reply here: http://www.sc2replayed.com/replay-videos/11913 


Appendix: Special Units

The Swarm has five units which are unique to this scenario and each time one enters the game it is announced. A description of each of these unique units follows.

Hunterlings

These nasty critters jump cliffs like reapers and use a leap attack to lock on to a unit, disable it and deal a lot of direct damage. These can be absolutely deadly if they manage to get into your mineral line.

Kaboomer 

These slow, Baneling-like units use an acid attack on buildings and deal some damage on death. These are good to focus-fire if it will make the difference between them dying early or getting their attack off. Make sure to repair buildings that come under their attack.

Spotter

 A giant Overseer-like flying unit, these are dangerous as they can spot the high ground which exposes your units to Infested Marine fire and because they have a Contamination ability which disables buildings such as Missile Turrets and Bunkers. The cooldown and duration of the Contamination ability means that they can affect two buildings so one Missile Turret and one Bunker is not enough. Spotters also do a decent amount of damage so they are a top priority.

One useful tip is that Spotters will stop to destroy Spider Mines. So if you aren’t already using your Vultures this is another reason to do so.

Choker 

 A bloated unit similar to the Infestor, these creatures will use their Snare to draw a unit away from your defences. They will target the closest unit they can see so having Marines or SCVs closer then Siege Tanks is an excellent way to remove most of the threat they present.

Stank

Similar to the Brutalisk from the campaign the Stank is the most formidable of the units you will face. With its area of effect melee attack the Stank can be devastating if left unchecked. Due to it’s very high HP it can even survive the daylight for a long time. Always target fire the Stank with all non-siege units to minimize the damage it does. Well-placed Planetary Forteresses can help greatly in dealing with the Stank.

Nydus Worm 

Not technically a unit but rather a unit-spawning structure. The Nydus Worm will appear randomly on the map or in your base and start unloading units rapidly. Although you won’t face any Nydus attacks in your first four nights on Brutal difficulty they will become the bane of your existence on Left2Die mode. The screen will shake before they appear so use this warning to gather a group of mobile forces to take it out.

Make sure to focus-fire the Nydus Worm down ASAP, it will spawn Abberations and other units constantly until it is dead. If your base is quite busy using a ‘move’ command to the Nydus and then attacking it can help you destroy it more quickly, don’t be afraid to use Stimpack to help you get there more quickly. Once the Nydus is destroyed you can go about killing off the units it unloaded.


This guide and the accompanying videos were produced by Highlander, a self-confessed achievement junkie from the SEA server. If you have good writing skills or video production talent and wish to contribute to LearningSC2.com be sure to contact me!


Effective Harassment

In this article I look at what makes harassment effective and some of the traps to avoid when trying to harass.

Harassment is very exciting to watch in professional matches and can be great fun to emulate. Harassment is usually done to gain some sort of advantage through economic damage, disruption of production or by throwing off your opponent. While it seems like harassment would always be good sometimes you will do what seems like a lot of damage and still lose. There are a few things going on below the surface when top-tier players harass and there are some pitfalls to be aware of if you want your harassment to be effective.


Guaranteed Damage

The concept of guaranteed damage is important in harassment and even in normal attacks. You have probably noticed that when people harass they will try and kill workers, Pylons, Supply Depots or Overlords. The reasoning behind this seems kind of obvious, kill your opponents workers and they will be getting less income, kill their supply and they will become supply blocked. However, there is another level of reasoning at work here, guaranteed damage.

This Pylon is known as a 'critical Pylon' and it is a high priority target as it powers four structures.

Guaranteed damage simply means that you will be able to kill what you are trying to kill. If, for example, you drop a Medivac full or Marines in your Protoss opponents base you have a few choices and it may be tempting to go for the one with the biggest reward – the Nexus. However, it may take 30 seconds to kill the Nexus and in that time your units could be killed or repelled, leaving you with no damage done. If, you instead went for Probes or Pylons, which have much less health and are easier to kill, you will be almost guaranteed to do some damage before your opponent can defend.

It is essentially a question of risk vs reward, and you are always much safer going for an easier to obtain but smaller advantage then going for an unlikely to obtain but larger advantage. The following are a few examples of things to target when harassing with the concept of guaranteed damage in mind:

Vs. Protoss

  • Probes – Economic damage and easy to kill.
  • Pylons – Disrupts production by un-powering structures and affects supply cap. Single Pylons powering multiple buildings are high-priority targets.

Workers mining gas are a good target as killing them can delay your opponents tech and some people will forget to replace them.

Vs. Terran
  • SCVs – Economic damage, easy to kill and can not regenerate between multiple attacks.
  • Mules – The same as SCVs but are higher priority due to the amount of minerals they harvest.
  • Supply Depots – Affects supply, and relatively easy to kill.
  • Tech Labs and Reactors – Have low health and killing them slows production or prevents higher tech units from being produced.

Vs. Zerg

  • Drones – Economic damage and easy to kill.
  • Overlords – Affects supply, easy to kill before speed upgrade and can often be found outside the bases of carless Zergs.
  • Queens – Slow if caught off Creep, relatively easy to kill and slows down unit production greatly due to missed Larva Injects.
You may have noticed that there is a way to affect the income, supply and production of each race. It is up to you to recognise which is the most important in each game. Do you need to delay an attack by affecting supply or production? Or do you need to gain an economic advantage for a late-game win?


Two Places at Once 

When harassing your opponent you never want to only attack one spot at a time. It is much easier for your opponent to defend, you are more likely to lose your units without doing any damage. A good example is sending a Medivac full of Hellions to attack your opponents main base. It is very easy for your opponent to pull back their army and kill off your attack before you have a chance to do any damage. If in that same scenario you sent Two Medivacs, one to the main and the other to the opponents third base your opponent may be able to easily defend one (simply retreat the attack that he tries to defend) but the other will go undefended. If instead your opponent splits his army and defends both Hellion drops they will be weak to a frontal assault. If they do neither then they will lose a lot of economy.

Another excellent way to incorporate multi-pronged harassments is to harass while attacking with you main army. While preoccupied with your frontal assault your harassment will likely go unnoticed and will cause a lot of damage. You can then simply retreat your main army and your harassment having doen the damage needed to secure a long-term victory.

Always be on the lookout for ways to spread your opponents resources thin, multi-pronged harassment will achieve this even if it does not actually do any damage. The threat of harassment can often be enough to secure you an advantage.

Frame by Frame example of a two pronged attack.

In the first frame the main army prepares to attack the opponents front while a Warp Prism full of Zealots prepares to drop at the east. In frame 2 the main army engages and the Warp Prism unloads in the mineral line. Having done the damage required to secure victory, the main army retreats in frame 3 to avoid unnecessary losses. Unfortunately the Warp Prism is destroyed preventing the Zealots from escaping but it was a worthwhile trade.


Takes the Opponents Focus

Good harassment will cause your opponent to make mistakes, to let their units get out position and to forget key parts of their build. The threat of harassment, like a Warp Prism sitting just outside their base can stress your opponent out or cause them to make more static defences then they would otherwise like to.


Doesn’t Put You Behind – Micro vs Macro

If your harassment taxes your own attention too much you will macro poorly and may even end up in a worse position than your opponent. Some harassment tactics require more micromanagement than others. Banshee harass and High Templar drops, for example, require a lot of attention and unless you are able to continue macro-ing whilst doing them they should be avoided by beginners. 

However, there is no reason to not apply the same tactics to simpler harassment tactics. For example, attacking the front with your main army while running a few units to an unguarded expansion can be very effective in lower leagues. 


Don’t Force it

The worst thing you can do is to overcommit to harassment. Don’t make harassment your main objective, and if your opponent is able to easily defend themselves then don’t try and force it. Each failed harassment attempt weakens your main army and makes you susceptible to a straight up attack. Incorporate harassment into your normal play while being aware of the above things and you will see a lot of success.


Have you had much success with harassment? Sometimes harassment tactics can seem very powerful and can win you games outright. But then there are other times when you appear to do a lot of damage but actually fall behind. Hopefully this article helps you understand some of the less-known aspects of the popular tactics.


Disable Mouse Acceleration – Windows and Mac

In this article I discuss another easy, settings-based way to improve your Starcraft 2 performance.


Mouse acceleration changes the distance your mouse cursor moves on screen based on how fast you move the mouse. Essentially, the faster you move your mouse the further your cursor will move.

Mouse acceleration is enabled by default on most Windows systems and all Mac systems (due to Mac’s emphasis on touchpad use) as it makes it easier to move  the cursor across large screens or on small desk spaces. 

There is a simple test you can do to better understand the effects of mouse acceleration. First move your mouse from one side of your mouse pad to the other very slowly and take notice of how far your cursor travels on screen. Now do the same thing but this time move your mouse very quickly, again notice how far it moves. In the first instance you may reach the end of your mouse pad before your cursor reaches the end of the screen and in the second instance the mouse probably hit the other side of the screen very quickly. If you didn’t notice any difference then you may already have it disabled.


Why You Should Disable Mouse Acceleration 

 Although mouse acceleration can be quite useful for touch pads and small desk spaces it is not ideal for most gaming applications, especially Starcraft 2. In SC2 consistency is very important and every time you move your mouse from point A to point B you want your in-game cursor to do the same thing. A good example of where this consistency is important is in selecting a worker and telling them to mine. With mouse acceleration you may select the worker but then overshoot the mineral line if you try to move to quickly. With mouse acceleration disabled the mouse movement to send that worker to mine will be the exact same movement every time. 

Having the same movement to perform the same action every time is great for the creation of muscle memory. We know from keyboard usage that muscle memory is very important in Starcraft 2, it allows you to perform actions without thinking about them. The same goes for mouse actions.

At first having mouse acceleration disabled will feel quite odd and your mouse movements will feel exaggerated but this is good and it does not take very long to get used to. So do yourself a favour, stop wrestling with erratic mouse movements and disable mouse acceleration.


How to Disable on Windows

 A windows 7 fix can be found here.

 A Windows XP fix can be found here.

Both fixes involves disabling the ‘Enhanced Mouse Precision’ feature and then installing a registry fix to prevent it from enabling itself again, which it seems to do for some reason. As for Vista it seems that just disabling ‘Enhanced Mouse Precision’ under mouse settings is the best you can get as I have not been able to find a registry fix for it. If you do know of one for Vista please let us know in the comments section.


How to Disable on Mac OSX

The simplest Mac fix can be found here. 

Install the fix provided and review the readme as there are a few things you have to be aware of so that mouse acceleration does not re-enable itself. The only strange thing I have noticed with this fix is that when Starcraft 2 is windowed and you click elsewhere acceleration re-enables itself for about one second before disabling again, however, this is only a minor issue. 


Disabling mouse acceleration was a big step for me as I had always had it on prior to playing Starcraft 2. The drive to get better at the game made me willing to make the adjustment and I could never go back. The accuracy of 1:1 mouse movement makes controlling units much less frustrating and has really helped me improve.


What are your experiences with mouse acceleration? Chances are that if you’re fairly new to gaming this is something you did not realise was affecting your gameplay. Leave a comment below!


How to Get Your Partner Into StarCraft 2

In this article I discuss how to introduce your partner into the world of SC2.

It can be hard to play and enjoy StarCraft 2 when your partner does not understand or like it.  If you’re reading this then StarCraft 2 is likely more than just a game to you, it is a hobby that you put a lot of effort into, get a lot out of, and, make friends whilst doing. Not being able to share something that is so important with the people you are close to won’t only affect your enjoyment of the game but it will also strain relationships.

The good news is that it is nearly always possible to transform your significant other into a StarCraft lover, or, at the very least have them understand and respect your love of the game. Helping @Gilbertamie to understand my love of Starcraft 2 (she recently bought her own account!) and helping a few friends with their own struggles has given me a few ideas on the best ways to approach this challenge. Unsurprisingly, a lot of what I will discuss focuses around the key theme of honesty. Being honest about what you love is the best way to win someone over, so let’s kick things off with that idea.

A cheeky yet sweet Starcraftt 2-themed letter sent to me by @Gilbertamie. Click to enlarge.

Be Honest

Being honest is the first and most important step when trying to get your partner into StarCraft 2. Partners often want to know what their other half is interested in and unless your honest about your love affair with this game then they will not make an effort to appreciate it.

If you are hiding the fact that you love StarCraft 2 then take some time to think about why. Are you afraid that they will consider it nerdy? Does it seem like they wouldn’t be interested? Gaming can’t really be a hobby can it?

Gaming is becoming more mainstream as a hobby with ‘casual’ games converting traditionally non-gamers into people that play fairly frequently. In addition to this the more ‘serious’ world of gaming has had a change where instead of female gamers being considered nerdy they are considered cool. These trends alongside the growth of eSports mean that gaming is becoming a more serious part of peoples lives and not just a past-time of the nerdy.

It is the perfect time to be honest about your love affair with Starcraft 2, take the leap and get your partner, friends and family into it too!


Commentate Your Own Replays

Showing that you are willing to embarrass yourself to share one of your games with your partner can be a big help. Pick a fun game that you played and cast it. It could be a win or a loss (I prefer losses for entertainment value but this is up to you) and run through it explaining what you were thinking, what you thought your opponent was doing and how this was good/bad for you.

Remember to keep it entertaining, say what was fun, what you did well and what you did badly. In trying to win over @gilbertamie I cast a number of games to her:

“It was good to see what level you (ZiggyD) were at and it was funny to hear you putting on your casting voice, 

“I also liked being able to ask you questions as the game played out and having you explain why you chose certain units was interesting.” @gilbertamie said. 

Having your partner get involved like this is a great step forward, it takes the game from something you do by yourself to something you can share together. There is also something very honest about casting a game for someone one-on-one so let your enthusiasm show through.


Explain the Major Personalities in the SC2 Community

There are a lot of interesting personalities in the professional Starcraft 2 scene and sharing this aspect with your partner gives them someone to cheer for or someone to hate. Tell them a bit about the people playing in current tournaments, their personalities and their distinctive play-styles. 

Once your partner knows the personalities behind the game it will become easier and more fun to watch games and tournaments with them.


Talk About the Community

 Even taking away the major personalities the Starcraft 2 community is very impressive. Thousands of people attend tournaments all year round and thousands more tune in to live streams to support their favourite players. The Starcraft 2 community is also one of the friendliest communities I have been apart of. Make sure to show this side of the game to your partner, seeing so many great people connect over this common interest is very convincing,


Watch Shoutcasted Games Together

When beginning to watch professional games with your partner it is important to choose well casted ones. There are typically two types of casters: the highly analytical and the shoutcasters. The highly analytical casters are generally more interesting to experienced players who are looking to pick up on the nuances of the games. Shoutcasters on the other hand focus on excitement and entertainment with a fast paced play-by-play casting style.

When introducing your partner to the game choose shoutcasters or other beginner friendly casters. Some suggestions of beginner-friendly casters are:

  • Day[9]: Halfway between shoutcasting and the highly analytical style, Day[9] is very beginner friendly explaining strategy and tactics in less exciting moments of games and switching to a shoutcasting style in moments of action. You can find casts by Day[9] at his website Day9.tv or by watching any recent MLG or Dreamhack VODs.
  • TotalBiscuit: Considered to be the pioneer of the shoutcasting style. If you’re looking for action packed casting TotalBiscuit should be your first stop. You can find casts by TotalBiscuit on his YouTube channel. 
  • Tasteless and Artosis: The GSL casting duo are a happy medium between the two casting styles and are extremely entertaining. You can watch casts by Tastless and Artosis by tuning into the GSL or MLG tournaments.


Play the Game Together

Actually sitting down and playing some games with your partner is a great way to get them a bit more involved in the game. When @Gilbertamie said to me “Teach me how to play Starcraft” I knew I was on the right track.

Have your partner play a game vs the Easy AI while you help them out with the basics. Get them using some hotkeys and building some fun units. Alternatively, you could run through some campaign missions witth them if you think that would be better suited.


The Secret Weapon: Day[9] Daily #100

If you think you’re starting to win your partner over then it’s time to bring out the secret weapon, the coup de grace, Day[9] Daily #100 – My Life of Starcraft. In this two hour special Day[9] will make you laugh and cry and be proud to do so.

Set aside an evening, get some good food and drink and settle down with your partner to hear Day[9] pour his heart out on his stream. If, after watching this, your partner does not at least have a respect for what Starcraft 2 means to its players then they have a heart of ice! 

After this it’s also worth watching Day[9]’s Funday Mondays with them, or, watching them yourself with the volume turned up loud so they can hear. Laughter is very attractive. 


Buy Them A Copy

This final step may seem risky as you will be spending $50 – $80 on a game that they may not even play, but if they have even a slight interest it is your duty as a Starcraft 2 player to nurture that interest. So buy them a copy and tell them that they don’t have to play it, that you’re not expecting anything. If they do want to play it let them know that you will be more than happy to teach them or play co-op games with them.


Good Luck!

Good luck with bringing your partner into the world of Starcraft 2. The more people we can win over the better this game will become and the more the community will grow and thrive. Remember that although the above advice has worked well for me and others it’s up to you to best determine what will help your partner understand your passion. Above all else be honest and be open about what you love and you will win their respect.


@Gilbertamie is new to Starcraft 2 and is writing about her own learning experiences on her blog AmeliaGilbert.Wordpress.com. Be sure to check it out, leave a comment and follow her on Twitter! 

Addition:  Gilbertamie wrote a tie-in post to this one telling her side of the story. It’s a great read and very revealing! Make sure to check it out at her blog.


Does your partner play Starcraft 2 or are you yet to win them over? Tell us your experiences in the comments section below! 


Achievement Hunters: Co-op Stomp Coverage Insane AI

Highlander's Achievement Hunters: Co-op Stomp!

(Updated for Patch 1.4)

In this episode of Achievement Hunters Highlander looks at how to get the 2v2 Co-op Coverage Stomp Insane AI achievement.


I am often asked for help with this achievement and it has a decent pay-off. Once completed you will earn 10 points per difficulty (40 total) and if you do this for both 2v2 and 3v3 you will net a hefty total of 80 points!


The following guides explain how to do this for each of the three races:

Protoss

For Protoss you will be using the Cannon rush strategy found in the first video in the series: Achievement Hunters: Insane AI 3v3 Co-op Streak. Make sure to help your allies out as soon as you deny mining on your opponent as they may be struggling.


Terran

Upon starting the game immediately send an SCV to your opponents base and as soon as he arrives start building a Supply Depot. The intention here is to draw the workers from mining as they will attack the Depot, which the AI considers to be a threat. As soon as you see workers coming to attack press the ‘Halt’ command (hotkey ‘T’) and pull the SCV away from the enemies base. Wait untill the Depot is just about to be destroyed and cancel it (hotkey ‘Esc’) to get most of your money back. You will need to repeat this step as many times a possible to prevent the AI opponent from harvesting.

Meanwhile, you will need to use your multitasking ability to build a regular Supply Depot and Barracks fairly close to your opponents base to start building marines. Be careful not to build these too close to the AI’s base as it may draw their workers attention. Refer to the video for an example of how far away you should build these. Keep building Barracks and constantly train Marines.

When you have a force of 5 or so Marines move into the AI’s base to attack. Using this many will prevent the AI from defending itself with its workers so destroy any military units the AI has and then push to the mineral line to finish them off.


Zerg

As Zerg you will use a simple 7-Pool strategy combined with an aggro Extractor tactic similar to the Terrans aggro Supply Depot tactic. Build one Drone at the beginning of the game then begin saving minerals for a Spawning Pool. Once you start morphing the Spawning Pool send one Drone to your AI opponents base. While your Pool is morphing you can build another one or two Drones and save Larvae for Zerglings. Once your Pool is complete morph as many Zerglings as possible and then a Queen once your Larvae are all used up. Morph in Overlords as necessary.

When your Drone scout arrives at the AI’s base have it start building an Extractor on the opponents Geyser to draw workers from mining. Cancel and rebuild the Extractor when the health becomes very low. Doing this will disrupt mining greatly and will only have a minimal cost to you.

Once your Zerglings arrive engage any stray units at attack structures until you have sufficient forces to take on the AI’s workers. If the AI attempts to attack you with its Workers pull back until it sends back most of it’s workers giving you a few easy kills. Controlling this way will allow you to kill off the AI pretty quickly. If you are facing a Zerg AI you can have one or two Drones (including the one building the aggro Extractor) build Spine Crawlers on the opponents Creep to make the fight a lot easier.


A Few Things To Note:

  • If you get a map where the AI opponents spawn very close together they will defend as one and it will become quite difficult. Don’t be afraid to quit and try for a new map – your not going for a streak here so the losses won’t matter.
  • Keep in mind which match-up is easier for each of your allies. Leave Zerg opponents for your Zerg teammates and leave Protoss opponents for your Protoss or Terran allies.
  • If things go bad transition to Speedlings as Zerg or Reapers as Terran and use hit and run tactics to kill off the AI’s buildings. Have your Protoss allies feed you resources to further help.


Highlander is a self-confessed Achievement junkie and overall newbie on the SEA server. You can follow his achievement progress here.


If you have any comments or Requests for achievements you want to see covered let us know in the comments below!