Thursday, 9 of May of 2024

Tag » Settings

Developing Your StarCraft 2 Mechanics – A Back to Basics Guide

In this StarCraft 2 guide SC2Cha0s goes back to basics on the game's mechanics to make you a better and more competitive player overall.

Starcraft II is a very challenging and invigorating game that can take years to master. This article will be the start of a companion guide to a video series that was started this week. Today, we will be venturing on a journey to master the art of control groups and location hotkey. Utilizing these tools in SCII will greatly increase your ability to multitask as well as become more efficient at managing your base.

Before we get started, I suggest you open up your settings within Starcraft II and follow along this simple guide of setting up location hotkeys. Once logged in, go to:

  • Settings -> Hotkeys ->Global -> Camera.

Once here you should see a screen similar to the picture below.

StarCraft 2 Control Groups

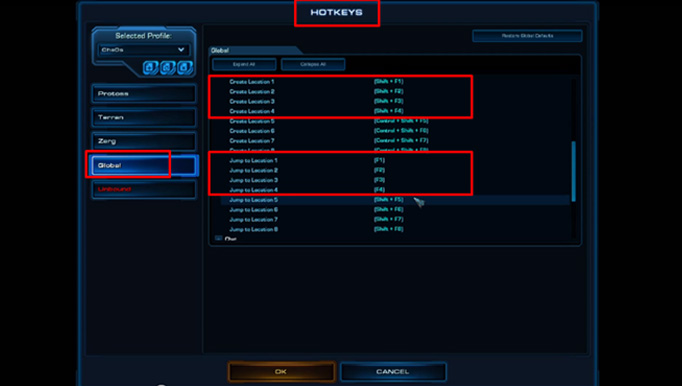
If you scroll down a bit, you will notice that Locations can be created using the key combination Ctrl+Shift+F1. Personally, I find this combination of key a little difficult to utilize. I have found that changing this bind to simply Shift+F1 makes these hotkeys a lot easier to utilize. Since I only use 4 location keys, I change locations 1 – 4 to this binding. Once that is complete, if you scroll down a bit more you will find the “Jump to Location #” hotkeys. I would recommend changing these to the simpler F1 – F4. This allows you to instantly jump to a location that has been set up by pressing the F1 – F4 (depending on which location you would like) key. Once these are set up, you are ready to give them a try. Start a custom game and gives these new bindings a try before utilizing them on the ladder.

The next topic I would like to discuss is Control groups. Control groups allow you to assign a group of units or buildings to a number key for easy access. For Example, at the beginning of every game (before the auto glhf), I tend to click the nexus build a probe and immediately hit Shift+4. This binds the nexus to the number “4” key and allows me to easily continue to build probes throughout the game.

Once a unit or building is bound to a number, centering your screen on that unit is rather easy. By double tapping a control group, the camera view will instantly center itself around the unit or group of units. This technique allows for players to switch between multiple units of interest extremely quickly. Pro players utilize this technique to have clear vision of everything within their units’ vision.

Below is the video series episode that discusses control groups and location hotkeys. This video will help you get started with setting up the location hotkeys as well as walk through a brief demonstration.

As a requirement to this Back to the Basics series, I would like you (yes, you the person reading this) to open up Starcraft 2 and create a custom game and give these mechanics a try. Once you have given it a try, come back to this article and let me know how it went. Also, feel free to leave any questions if you have any.

For more Starcraft 2 content and updates on tutorials and live streams feel free to follow me on Twitch and YouTube:

Have fun on the ladder!

Andre “Cha0s” Hitchcock


Disable Mouse Acceleration – Windows and Mac

In this article I discuss another easy, settings-based way to improve your Starcraft 2 performance.


Mouse acceleration changes the distance your mouse cursor moves on screen based on how fast you move the mouse. Essentially, the faster you move your mouse the further your cursor will move.

Mouse acceleration is enabled by default on most Windows systems and all Mac systems (due to Mac’s emphasis on touchpad use) as it makes it easier to move  the cursor across large screens or on small desk spaces. 

There is a simple test you can do to better understand the effects of mouse acceleration. First move your mouse from one side of your mouse pad to the other very slowly and take notice of how far your cursor travels on screen. Now do the same thing but this time move your mouse very quickly, again notice how far it moves. In the first instance you may reach the end of your mouse pad before your cursor reaches the end of the screen and in the second instance the mouse probably hit the other side of the screen very quickly. If you didn’t notice any difference then you may already have it disabled.


Why You Should Disable Mouse Acceleration 

 Although mouse acceleration can be quite useful for touch pads and small desk spaces it is not ideal for most gaming applications, especially Starcraft 2. In SC2 consistency is very important and every time you move your mouse from point A to point B you want your in-game cursor to do the same thing. A good example of where this consistency is important is in selecting a worker and telling them to mine. With mouse acceleration you may select the worker but then overshoot the mineral line if you try to move to quickly. With mouse acceleration disabled the mouse movement to send that worker to mine will be the exact same movement every time. 

Having the same movement to perform the same action every time is great for the creation of muscle memory. We know from keyboard usage that muscle memory is very important in Starcraft 2, it allows you to perform actions without thinking about them. The same goes for mouse actions.

At first having mouse acceleration disabled will feel quite odd and your mouse movements will feel exaggerated but this is good and it does not take very long to get used to. So do yourself a favour, stop wrestling with erratic mouse movements and disable mouse acceleration.


How to Disable on Windows

 A windows 7 fix can be found here.

 A Windows XP fix can be found here.

Both fixes involves disabling the ‘Enhanced Mouse Precision’ feature and then installing a registry fix to prevent it from enabling itself again, which it seems to do for some reason. As for Vista it seems that just disabling ‘Enhanced Mouse Precision’ under mouse settings is the best you can get as I have not been able to find a registry fix for it. If you do know of one for Vista please let us know in the comments section.


How to Disable on Mac OSX

The simplest Mac fix can be found here. 

Install the fix provided and review the readme as there are a few things you have to be aware of so that mouse acceleration does not re-enable itself. The only strange thing I have noticed with this fix is that when Starcraft 2 is windowed and you click elsewhere acceleration re-enables itself for about one second before disabling again, however, this is only a minor issue. 


Disabling mouse acceleration was a big step for me as I had always had it on prior to playing Starcraft 2. The drive to get better at the game made me willing to make the adjustment and I could never go back. The accuracy of 1:1 mouse movement makes controlling units much less frustrating and has really helped me improve.


What are your experiences with mouse acceleration? Chances are that if you’re fairly new to gaming this is something you did not realise was affecting your gameplay. Leave a comment below!


Seven Settings To Improve Your Play

In this article we look at some of the settings in Starcraft 2 that can help improve your play.

Game settings are something people will often neglect, but optimising them is simple and it can benefit your play immediately. In this article we will go through some of the settings that you can change in-game and what they will do for you.


Display the Command Hotkeys

In a previous article I discussed the importance of learning to use hotkeys in SC2. This setting shows the hotkey for each command on the command button itself rather than the tooltip (popup box when you mouse over the command).

Benefits

Having the hotkeys for each command easily visible can make learning them just a little bit easier. Once you have learned them all you will simply forget about even looking in that corner of the screen but for now this setting is one you should definitely enable.

How to Change This Setting

To display the command hotkeys:

  1. Go to the ‘Options’ menu,
  2. Open the Gameplay tab, and,
  3. Check the ‘Command Hotkey Text’ box.


The Game Timer

This handy addition to the game simply puts a timer above the mini-map in the user interface. This timer shows the current time of the match in Starcraft 2 time (1.38x Normal time on the ladder).

Benefits

The game timer may seem unimportant but it serves as an easy point of reference whilst in game. This allows you to note timings and have an idea of what you could see from your opponent at certain points in the match. You can also set times for yourself to aim for with certain things. For example, in Protoss vs Zerg I try to expand by 6:00, referring to the game timer lets me know if I have been delayed and by how much.

How to Change This Setting

To enable the Game Timer:

  1. Go to the ‘Options’ Menu,
  2. Open the ‘Gameplay’ Tab, and,
  3. Check the ‘Show Game Timer’ Box.


Enable Friend or Foe Colours

Rather than their random colours, the enemy is shown as red and you as green.

This setting is one of my personal favourites. Changing this setting changes the team colours from their defaults to green (yourself), red (enemies) and yellow (allies).


Benefits

Friend or foe colours make identifying enemy units via the mini-map and main screen much easier in 1v1 games. I am still undecided about it’s usefulness in team games, however, as it makes communicating with your allies a little difficult as all enemies are red. Being able to quickly identify the enemy will make it much easier to spot drops or enemy troop movements in your peripheral vision.

How to Change This Setting

To enable/disable friend or foe colours press ‘Alt+F’ whilst in a game. Alternatively, you can click the bottom button besides the mini-map. Your friend or foe colours setting will carry over into future games so you do not have to enable it every game.


Disable Operating System Shortcuts

This setting is worth changing if you have a problem with accidentally hitting a button that minimises the game or interferes somehow. If you don’t have a problem with this don’t worry about this setting.

How to Change This Setting

To disable the operating system shortcuts:

  1. Go to the ‘Options’ Menus,
  2. Open the ‘Controls’ Tab, and,
  3. Check the ‘OS Keyboard Shortcuts’ box.


Show Unit Status Bars

It may look messy as a viewer but as a player the status bars provide a lot of vital information.

Enabling the display of unit status bars will show  the health, shields, energy and production status of all units and buildings on the main game screen.


Benefits

  • Makes it easy to see the condition of your units so that you can make a decision to micro or retreat.
  • You can see the condition of enemy units allowing you to focus fire them easily.
  • Allows you to easily make out enemy spell-casters to focus fire, EMP or Feedback.
  • Allows you to easily see the current production or research status of any of your buildings, assisting with macro.

How to Change This Setting

I highly recommend setting the display of unit status bars to ‘always’, however, if you find this too messy you can set it to ‘selected’. You can change this setting by:

  1. Going to the ‘Options’ menu,
  2. Opening the ‘Gameplay’ tab, and,
  3. Selecting ‘Always’ or ‘Selected’ from the drop down ‘Show Unit Status Bars’ menu.


Un-clickable or Hidden Control Groups

If, like me, you find yourself accidentally clicking the control group icons at the bottom of the main game screen or you just want to get the most amount of screen space possible this is a good setting to change. There are two options available to you instead of the default visible and clickable setting: Visible but un-clickable or hidden.

How to Change This Setting

To set the control groups to unclickable or hidden:

  1. Go to the ‘Options’ menu,
  2. Open the ‘Gameplay’ tab, and,
  3. Select either ‘Hidden’ or ‘Unclickable’ from the ‘Control Groups’ drop-down box.


Display Build Grid

The build grid shows unbuildable terrain as yellow allowing for easier wall offs.

Enabling this setting will show a grid whenever you attempt to place a building. The grid shows unbuildable terrain and gives you an idea of how much space there is betweeen your buildings.


Benefits

The build grid makes walling off and base planning much easier. For example, as Protoss you need to leave a one square gap in your wall for units to pass through. Enabling this setting will help you set up your base just a little better so give it a try.

How to Change This Setting

To enable the display of the build grid:

  1. Go to the ‘Options’ Menu,
  2. Open the ‘Gamelpay’ tab, and,
  3. Check the ‘Display Build Grid’ box.


How do you set up your game? Are there any useful settings that I haven’t mentioned here? If so let me know in the comments below!


This article was a collaborative piece between ZiggyD and Ramzdale, a big thank you to Ramzdale for his help! If you are an aspiring writer and would like to write for LearningSC2 let me know!