
Seven Settings To Improve Your Play
Game settings are something people will often neglect, but optimising them is simple and it can benefit your play immediately. In this article we will go through some of the settings that you can change in-game and what they will do for you.
Display the Command Hotkeys
In a previous article I discussed the importance of learning to use hotkeys in SC2. This setting shows the hotkey for each command on the command button itself rather than the tooltip (popup box when you mouse over the command).

Benefits
Having the hotkeys for each command easily visible can make learning them just a little bit easier. Once you have learned them all you will simply forget about even looking in that corner of the screen but for now this setting is one you should definitely enable.
How to Change This Setting
To display the command hotkeys:
- Go to the ‘Options’ menu,
- Open the Gameplay tab, and,
- Check the ‘Command Hotkey Text’ box.
The Game Timer
This handy addition to the game simply puts a timer above the mini-map in the user interface. This timer shows the current time of the match in Starcraft 2 time (1.38x Normal time on the ladder).
Benefits
The game timer may seem unimportant but it serves as an easy point of reference whilst in game. This allows you to note timings and have an idea of what you could see from your opponent at certain points in the match. You can also set times for yourself to aim for with certain things. For example, in Protoss vs Zerg I try to expand by 6:00, referring to the game timer lets me know if I have been delayed and by how much.
How to Change This Setting
To enable the Game Timer:
- Go to the ‘Options’ Menu,
- Open the ‘Gameplay’ Tab, and,
- Check the ‘Show Game Timer’ Box.
Enable Friend or Foe Colours

Rather than their random colours, the enemy is shown as red and you as green.
This setting is one of my personal favourites. Changing this setting changes the team colours from their defaults to green (yourself), red (enemies) and yellow (allies).
Benefits
Friend or foe colours make identifying enemy units via the mini-map and main screen much easier in 1v1 games. I am still undecided about it’s usefulness in team games, however, as it makes communicating with your allies a little difficult as all enemies are red. Being able to quickly identify the enemy will make it much easier to spot drops or enemy troop movements in your peripheral vision.
How to Change This Setting
To enable/disable friend or foe colours press ‘Alt+F’ whilst in a game. Alternatively, you can click the bottom button besides the mini-map. Your friend or foe colours setting will carry over into future games so you do not have to enable it every game.
Disable Operating System Shortcuts
This setting is worth changing if you have a problem with accidentally hitting a button that minimises the game or interferes somehow. If you don’t have a problem with this don’t worry about this setting.
How to Change This Setting
To disable the operating system shortcuts:
- Go to the ‘Options’ Menus,
- Open the ‘Controls’ Tab, and,
- Check the ‘OS Keyboard Shortcuts’ box.
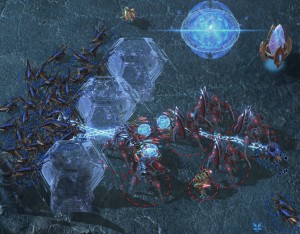
Show Unit Status Bars

It may look messy as a viewer but as a player the status bars provide a lot of vital information.
Enabling the display of unit status bars will show the health, shields, energy and production status of all units and buildings on the main game screen.
Benefits
- Makes it easy to see the condition of your units so that you can make a decision to micro or retreat.
- You can see the condition of enemy units allowing you to focus fire them easily.
- Allows you to easily make out enemy spell-casters to focus fire, EMP or Feedback.
- Allows you to easily see the current production or research status of any of your buildings, assisting with macro.
How to Change This Setting
I highly recommend setting the display of unit status bars to ‘always’, however, if you find this too messy you can set it to ‘selected’. You can change this setting by:
- Going to the ‘Options’ menu,
- Opening the ‘Gameplay’ tab, and,
- Selecting ‘Always’ or ‘Selected’ from the drop down ‘Show Unit Status Bars’ menu.
Un-clickable or Hidden Control Groups
If, like me, you find yourself accidentally clicking the control group icons at the bottom of the main game screen or you just want to get the most amount of screen space possible this is a good setting to change. There are two options available to you instead of the default visible and clickable setting: Visible but un-clickable or hidden.
How to Change This Setting
To set the control groups to unclickable or hidden:
- Go to the ‘Options’ menu,
- Open the ‘Gameplay’ tab, and,
- Select either ‘Hidden’ or ‘Unclickable’ from the ‘Control Groups’ drop-down box.
Display Build Grid

The build grid shows unbuildable terrain as yellow allowing for easier wall offs.
Enabling this setting will show a grid whenever you attempt to place a building. The grid shows unbuildable terrain and gives you an idea of how much space there is betweeen your buildings.
Benefits
The build grid makes walling off and base planning much easier. For example, as Protoss you need to leave a one square gap in your wall for units to pass through. Enabling this setting will help you set up your base just a little better so give it a try.
How to Change This Setting
To enable the display of the build grid:
- Go to the ‘Options’ Menu,
- Open the ‘Gamelpay’ tab, and,
- Check the ‘Display Build Grid’ box.
How do you set up your game? Are there any useful settings that I haven’t mentioned here? If so let me know in the comments below!
This article was a collaborative piece between ZiggyD and Ramzdale, a big thank you to Ramzdale for his help! If you are an aspiring writer and would like to write for LearningSC2 let me know!


